> ## Documentation Index
> Fetch the complete documentation index at: https://docs.incident.io/llms.txt
> Use this file to discover all available pages before exploring further.
# Writing & editing post-mortems
> A collaborative editor with deep access to your incident data, catalog, and integrations.
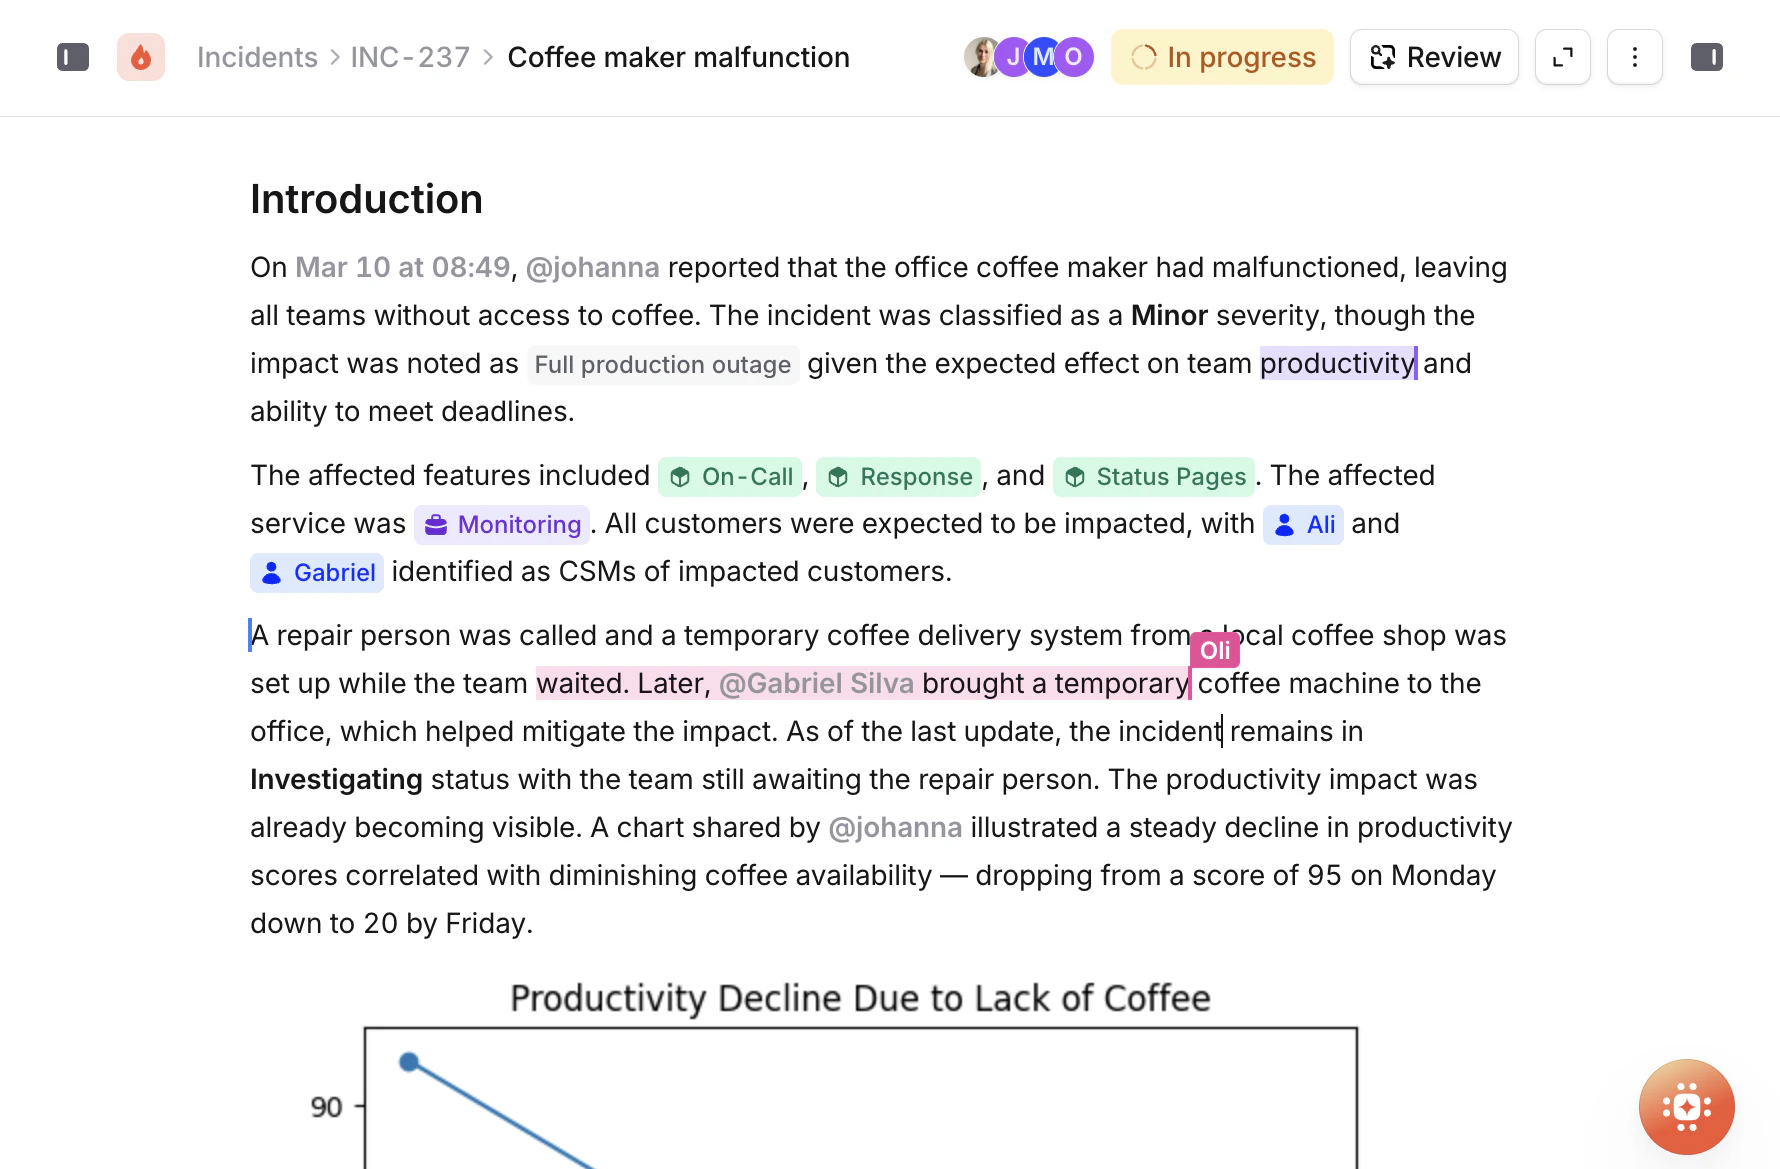
Writing a post-mortem means gathering information from a dozen different places: Slack threads, monitoring dashboards, GitHub PRs, your service catalog. The post-mortem editor is designed to bring all of that into one place. It's a real-time collaborative editor with all the formatting you'd expect from a modern writing tool, but with deep access to your incident data, your catalog, and your integrations.
This is what makes it different from writing your post-mortem in Notion or Google Docs. You're not just writing text. You can reference a Slack message and it renders as a rich card. You can mention a catalog entry and it links directly to your service. You can pull in timestamps from your incident timeline without having to go find them. Everything stays in sync with the incident as it evolves.
## Creating a post-mortem
To create a post-mortem, go to an incident and click the "Create post-mortem" button. You'll be asked to select a template, and clicking "Create" will take you straight into the editor. If you have a post-incident flow configured with a "Create post-mortem" task, the button is right there in the task.
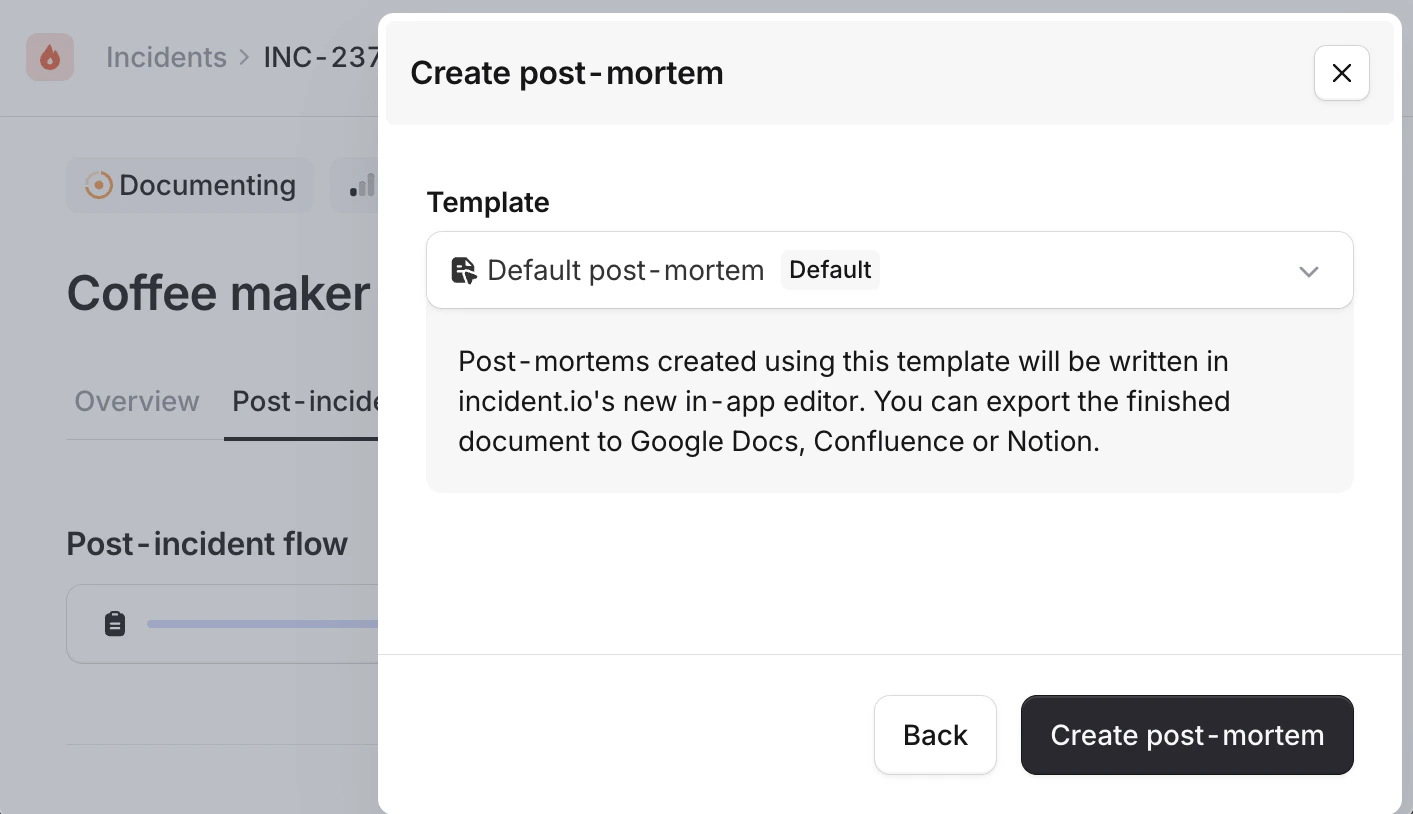 Once the document has been created, you're ready to start editing.
## The editor
The editor is fully collaborative. Multiple people can have the document open at the same time, and you'll see each other's edits as they happen. You can see who's present in the document, where their cursors are, and what they're highlighting. This works especially well when you're writing the post-mortem together during a debrief call.
Once the document has been created, you're ready to start editing.
## The editor
The editor is fully collaborative. Multiple people can have the document open at the same time, and you'll see each other's edits as they happen. You can see who's present in the document, where their cursors are, and what they're highlighting. This works especially well when you're writing the post-mortem together during a debrief call.
 ### Formatting
The editor supports all the formatting you'd expect from a modern writing tool:
* **Headings** (H1, H2, H3) for structuring your document
* **Bold**, **italic**, **underline**, **strikethrough**, and **inline code** for inline formatting
* **Bulleted lists** and **ordered lists**
* **Blockquotes** for highlighting key points or quoting messages
* **Links** with full editing support
Highlight any text to open the formatting toolbar, where you can apply these styles quickly.
### Slash commands
Type `/` anywhere in the document to open the block menu. This gives you access to richer content blocks:
### Formatting
The editor supports all the formatting you'd expect from a modern writing tool:
* **Headings** (H1, H2, H3) for structuring your document
* **Bold**, **italic**, **underline**, **strikethrough**, and **inline code** for inline formatting
* **Bulleted lists** and **ordered lists**
* **Blockquotes** for highlighting key points or quoting messages
* **Links** with full editing support
Highlight any text to open the formatting toolbar, where you can apply these styles quickly.
### Slash commands
Type `/` anywhere in the document to open the block menu. This gives you access to richer content blocks:
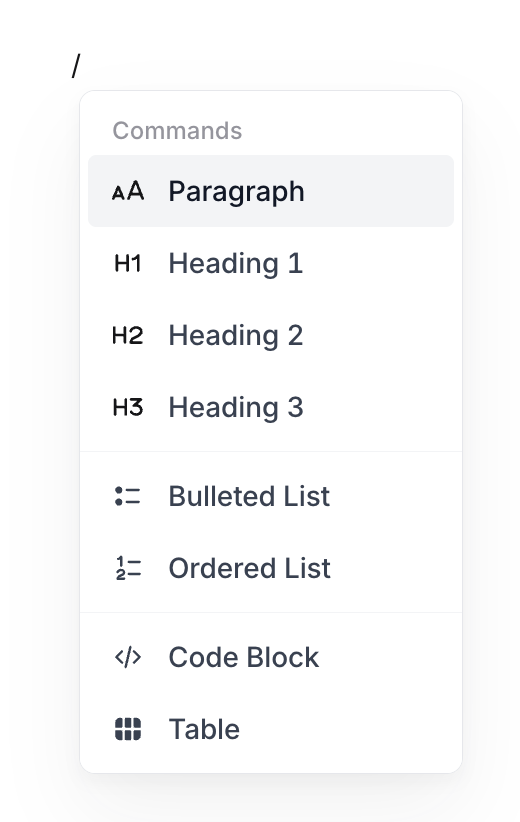 * **Callouts** for drawing attention to important information, warnings, or notes
* **Code blocks** with syntax highlighting for sharing configuration, logs, or scripts
* **Tables** for structured data (resizable columns, header rows)
* **Images** (upload directly, or insert from your incident's Slack or Teams channel)
* **Horizontal rules** for visual separation between sections
* **Incident timeline** to embed your full incident timeline directly in the document
* **Follow-ups** to embed the list of follow-up items associated with the incident. You can also create new follow-ups directly from the editor. See [Follow-ups](/post-incident/follow-ups) for more on how follow-ups work.
* **Meeting notes** to embed the transcript and takeaways from a Scribe recording of your debrief call
The incident-specific blocks (timeline, follow-ups, meeting notes) are kept in sync with the incident. If someone adds a new follow-up, it shows up in the embedded block automatically.
### Mentions
This is where a lot of the power of the editor comes from. Type `@` to reference data from across your incident and your organization. Mentions render as rich, interactive elements in the document, not just plain text.
**Incident data:**
* **Timestamps** from your incident timeline, so you can reference exactly when things happened
* **Durations** showing elapsed time since the incident started
* **Custom fields** associated with the incident
* **Follow-ups** associated with the incident
* **Other incidents**, if you need to reference related events
**People:**
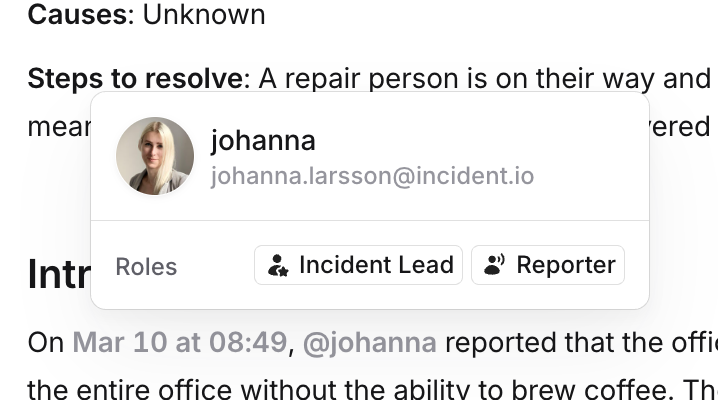
* **Users** involved in the incident, with context about their role
* **Role assignments** (incident lead, communications lead, etc.)
* **Callouts** for drawing attention to important information, warnings, or notes
* **Code blocks** with syntax highlighting for sharing configuration, logs, or scripts
* **Tables** for structured data (resizable columns, header rows)
* **Images** (upload directly, or insert from your incident's Slack or Teams channel)
* **Horizontal rules** for visual separation between sections
* **Incident timeline** to embed your full incident timeline directly in the document
* **Follow-ups** to embed the list of follow-up items associated with the incident. You can also create new follow-ups directly from the editor. See [Follow-ups](/post-incident/follow-ups) for more on how follow-ups work.
* **Meeting notes** to embed the transcript and takeaways from a Scribe recording of your debrief call
The incident-specific blocks (timeline, follow-ups, meeting notes) are kept in sync with the incident. If someone adds a new follow-up, it shows up in the embedded block automatically.
### Mentions
This is where a lot of the power of the editor comes from. Type `@` to reference data from across your incident and your organization. Mentions render as rich, interactive elements in the document, not just plain text.
**Incident data:**
* **Timestamps** from your incident timeline, so you can reference exactly when things happened
* **Durations** showing elapsed time since the incident started
* **Custom fields** associated with the incident
* **Follow-ups** associated with the incident
* **Other incidents**, if you need to reference related events
**People:**
* **Users** involved in the incident, with context about their role
* **Role assignments** (incident lead, communications lead, etc.)
 **Catalog:**
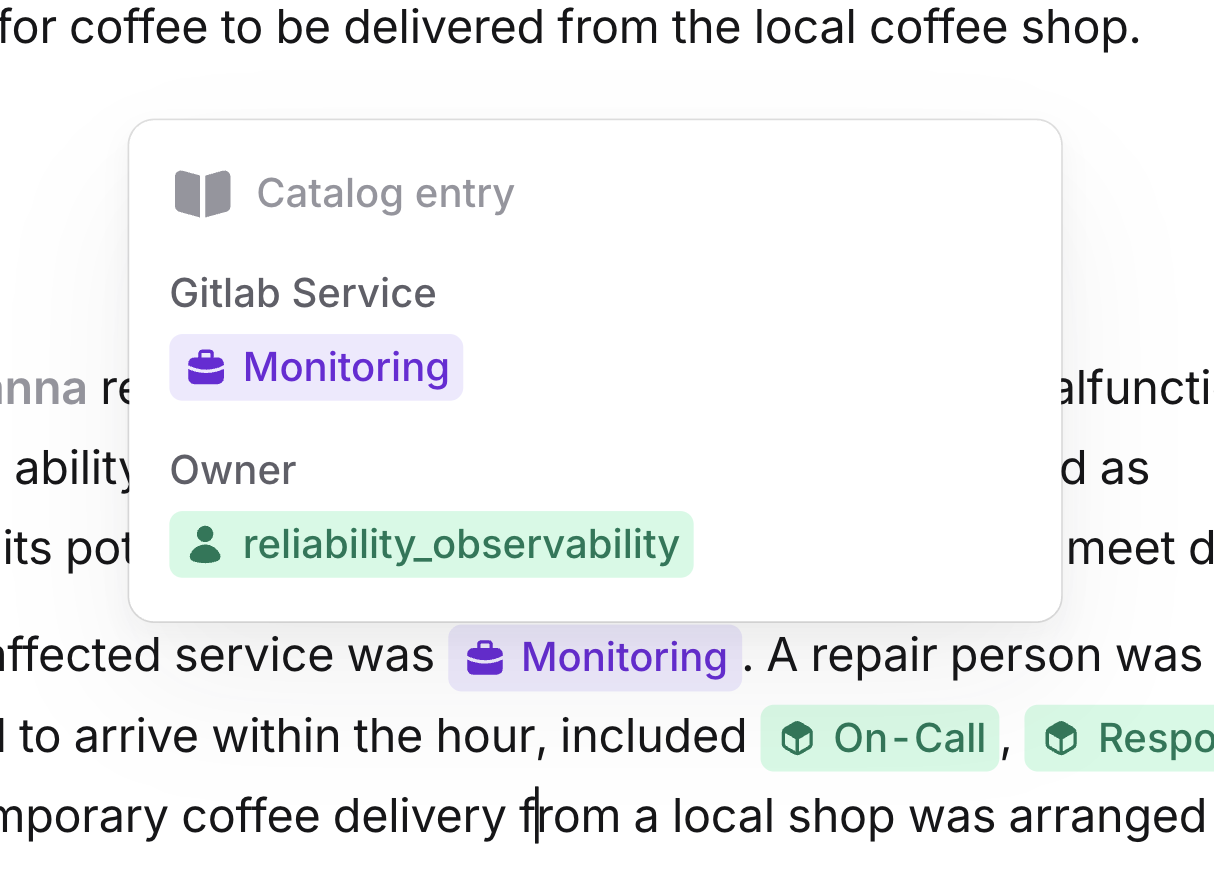
This is where the editor really sets itself apart. You have access to your entire catalog setup, which means you can reference:
* **Services** affected by the incident
* **Teams** and team structures
* **Customers** and customer information
* **Infrastructure components**, environments, and anything else you've modeled in your catalog
Whatever you've structured in your catalog, you can reference it directly in your post-mortem. If you've set up relationships between services and teams, or between customers and their associated infrastructure, all of that context is available here.
**Catalog:**
This is where the editor really sets itself apart. You have access to your entire catalog setup, which means you can reference:
* **Services** affected by the incident
* **Teams** and team structures
* **Customers** and customer information
* **Infrastructure components**, environments, and anything else you've modeled in your catalog
Whatever you've structured in your catalog, you can reference it directly in your post-mortem. If you've set up relationships between services and teams, or between customers and their associated infrastructure, all of that context is available here.
 **Integrations:**
* **Slack messages** from the incident channel, rendered as rich cards with the original message content
* **GitHub PRs** that were attached to the incident
* **Slack channels** for referencing where conversations happened
Hovering over any mention shows additional context. A user mention shows their role in the incident. A catalog entry links to the full catalog page. A Slack message shows the original content. Everything is interactive and connected.
### Images
You can add images to your post-mortem in two ways:
* **Upload directly** using the `/` menu or by dragging and dropping an image into the editor
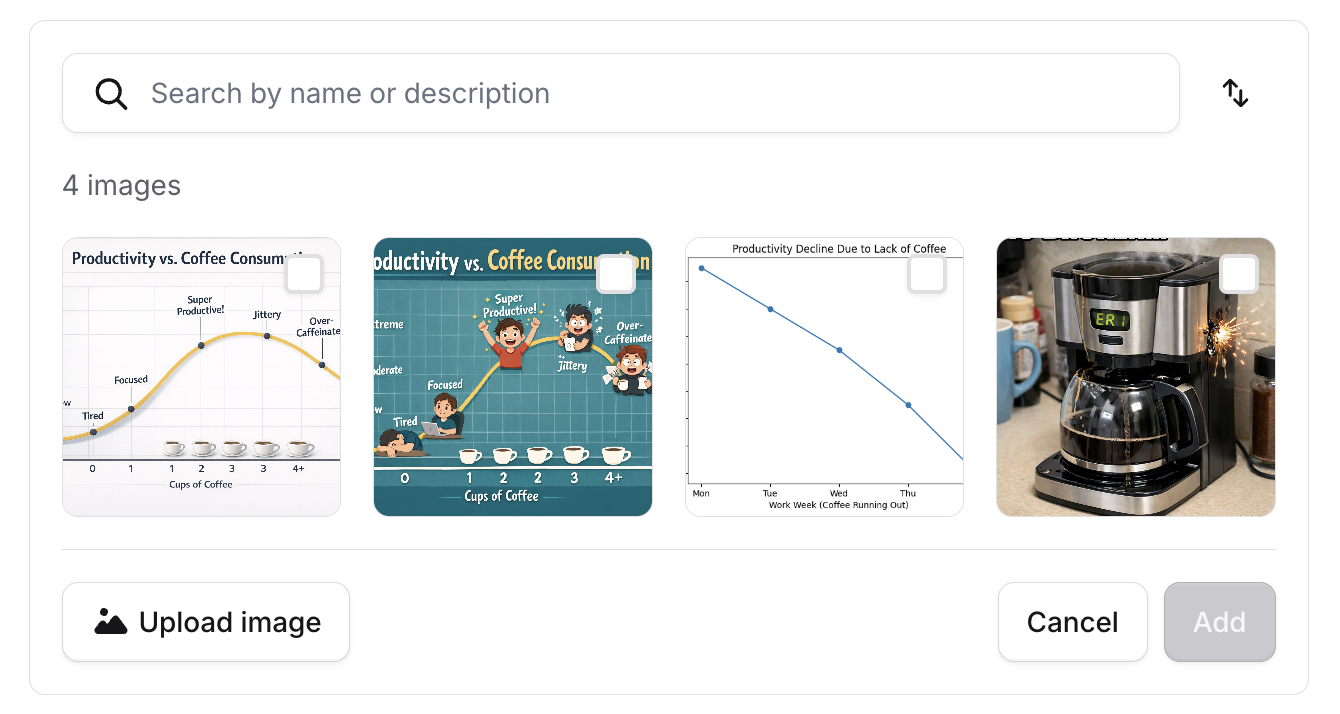
* **Insert from Slack or Teams**: browse images that were shared in the incident channel, search by description, and select multiple images at once. No need to download screenshots from Slack and re-upload them.
**Integrations:**
* **Slack messages** from the incident channel, rendered as rich cards with the original message content
* **GitHub PRs** that were attached to the incident
* **Slack channels** for referencing where conversations happened
Hovering over any mention shows additional context. A user mention shows their role in the incident. A catalog entry links to the full catalog page. A Slack message shows the original content. Everything is interactive and connected.
### Images
You can add images to your post-mortem in two ways:
* **Upload directly** using the `/` menu or by dragging and dropping an image into the editor
* **Insert from Slack or Teams**: browse images that were shared in the incident channel, search by description, and select multiple images at once. No need to download screenshots from Slack and re-upload them.
 ## Comments
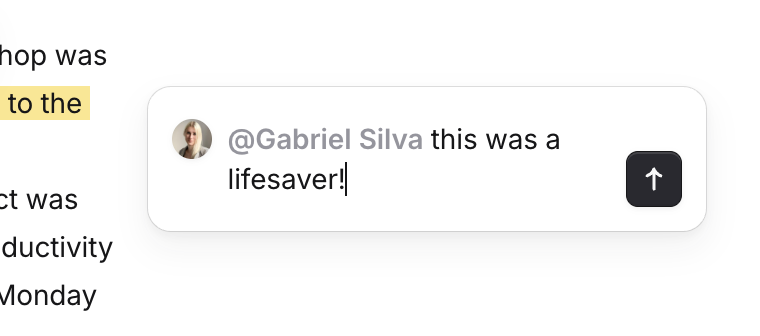
Select any text in the document and click the comment icon to start a threaded discussion. You can @mention people in comments to notify them. Comments can be replied to, resolved when addressed, and accessed later through the Resolved Comments sidebar in the overflow menu.
Comments are collaborative too. If someone adds a comment while you're in the document, it shows up in real time.
## Comments
Select any text in the document and click the comment icon to start a threaded discussion. You can @mention people in comments to notify them. Comments can be replied to, resolved when addressed, and accessed later through the Resolved Comments sidebar in the overflow menu.
Comments are collaborative too. If someone adds a comment while you're in the document, it shows up in real time.
 ## Version history
The editor automatically creates snapshots of your document as you work. You can access version history from the overflow menu in the top header. From there you can preview any previous version and restore it if you need to. Restoring a version doesn't destroy anything, it creates a new snapshot with the restored content.
## Analytics
The overflow menu also shows you document analytics: who has viewed the post-mortem and when, and who has made edits. This is useful for tracking engagement, especially if your team has a review step in the process.
## Main document
When you have multiple post-mortem documents for an incident, one is designated as the "main" document. The main document's status is what syncs to the incident's overall post-mortem status, and it's the one used by default in workflows and exports. You can change which document is main from the document's overflow menu.
## Deleting a post-mortem
Post-mortems can be deleted from the overflow menu. Deleting removes all versions of the document permanently, but once deleted, you'll be able to create a brand new one. If you've modified your template since the last post-mortem was created, the new document will use the updated template.
## Version history
The editor automatically creates snapshots of your document as you work. You can access version history from the overflow menu in the top header. From there you can preview any previous version and restore it if you need to. Restoring a version doesn't destroy anything, it creates a new snapshot with the restored content.
## Analytics
The overflow menu also shows you document analytics: who has viewed the post-mortem and when, and who has made edits. This is useful for tracking engagement, especially if your team has a review step in the process.
## Main document
When you have multiple post-mortem documents for an incident, one is designated as the "main" document. The main document's status is what syncs to the incident's overall post-mortem status, and it's the one used by default in workflows and exports. You can change which document is main from the document's overflow menu.
## Deleting a post-mortem
Post-mortems can be deleted from the overflow menu. Deleting removes all versions of the document permanently, but once deleted, you'll be able to create a brand new one. If you've modified your template since the last post-mortem was created, the new document will use the updated template.