> ## Documentation Index
> Fetch the complete documentation index at: https://docs.incident.io/llms.txt
> Use this file to discover all available pages before exploring further.
# Getting started with On-call
export const SlackCommand = ({command, alt, maxWidth, caption}) => {
const light = `/images/slack_command_screenshots/${command}-light.png`;
const dark = `/images/slack_command_screenshots/${command}-dark.png`;
return <>

 {caption &&
{caption}
}
;
};
## On-call Overview
Welcome to **incident.io's On-call** ! On-call is powered by our **Catalog** and consists of three main components:
* **Alerts**: Configure alerts from your observability tools.
* **Escalations**: Route alerts to the appropriate escalation paths, schedules, and team members.
* **Schedules**: Define who is on-call to receive escalations.
Once these are set up, we’ll page the right people so they can acknowledge the alert and jump into resolving the issue. We'll also go through how to manually create incidents in this article.
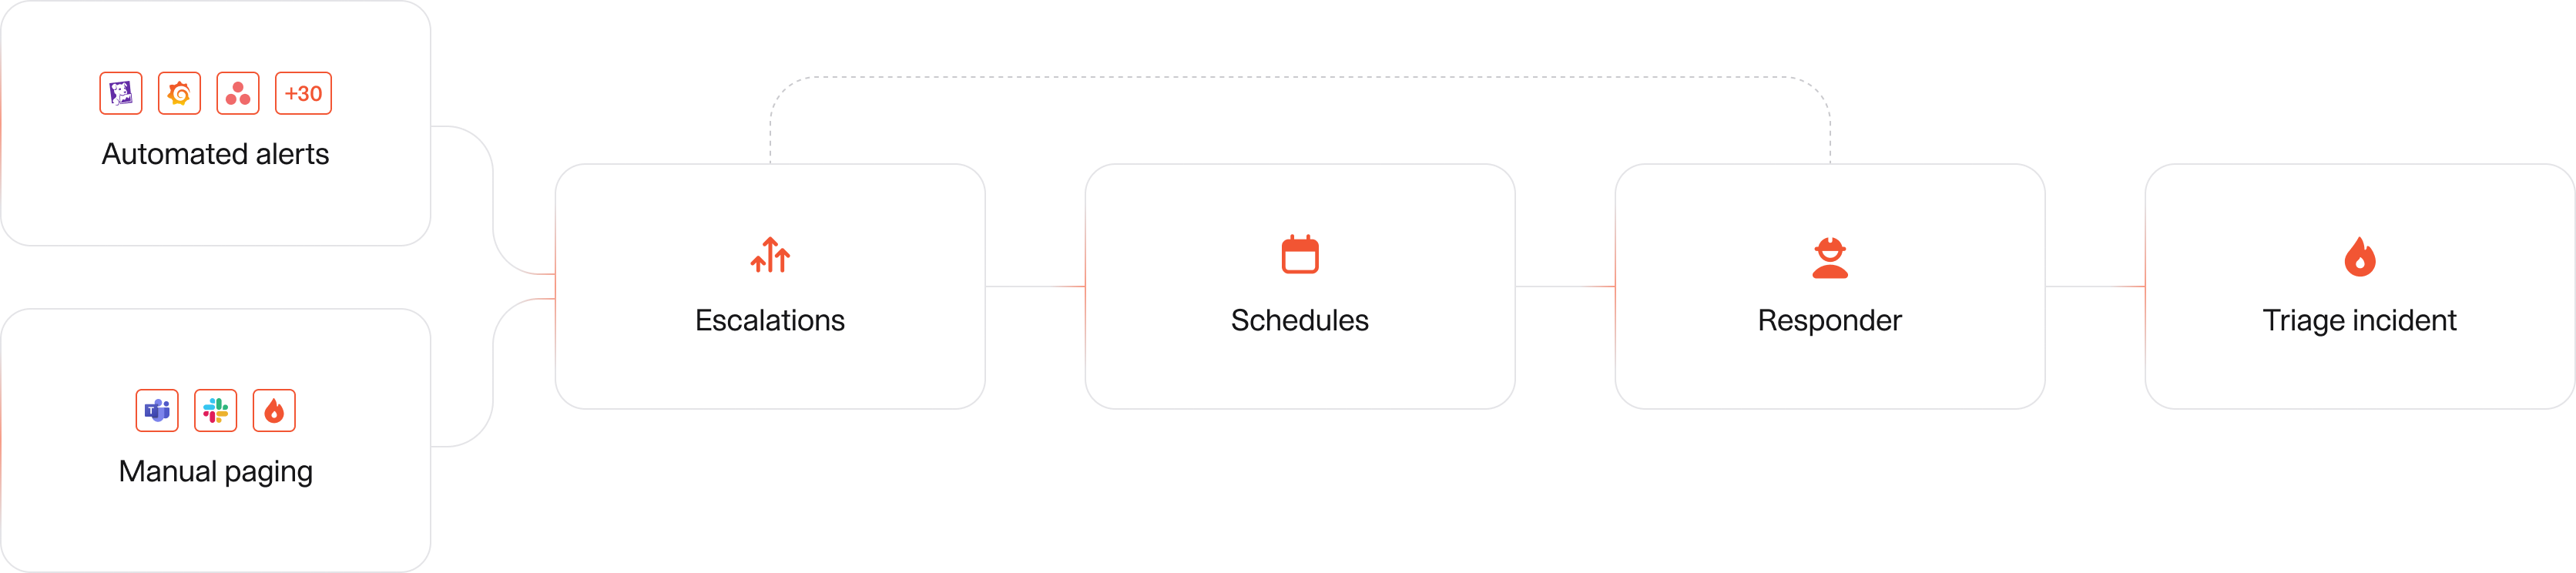 *Full flow on how alerts and incidents are created and the right people paged*
***
## 1. Setting up your teams
To route your alerts to the right people, you need to configure your teams. You can configure teams right here in incident.io, or bring them in from a 3rd party source, such as Slack, Cortex, Backstage, or your identity provider using SCIM.
1. Head to [Settings → Teams](https://app.incident.io/~/settings/teams)
2. Click 'Get started' to use our **Wizard** to connect your teams from a third-party tool, or create your own.
*Full flow on how alerts and incidents are created and the right people paged*
***
## 1. Setting up your teams
To route your alerts to the right people, you need to configure your teams. You can configure teams right here in incident.io, or bring them in from a 3rd party source, such as Slack, Cortex, Backstage, or your identity provider using SCIM.
1. Head to [Settings → Teams](https://app.incident.io/~/settings/teams)
2. Click 'Get started' to use our **Wizard** to connect your teams from a third-party tool, or create your own.
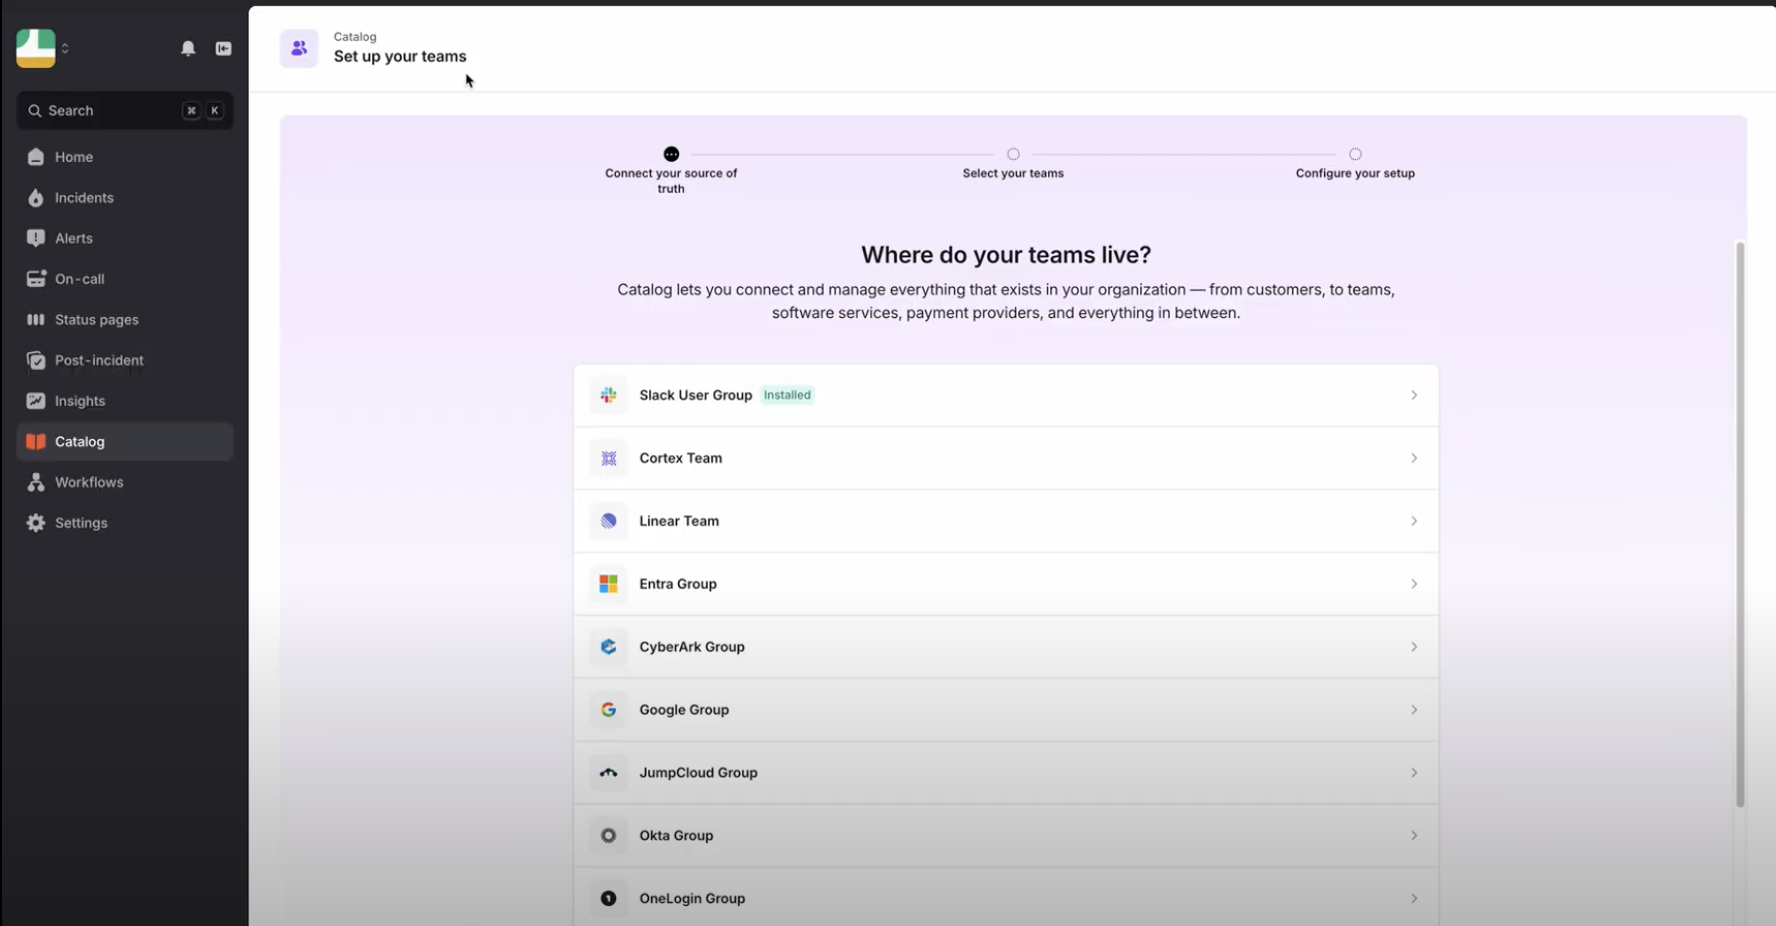 You can also structure your Catalog using **Services** or any custom type instead of teams. Learn more about Catalog powered On-call [here](/on-call/catalog-integration).
## 2. Building a Schedule
Next, create a schedule for your team. Schedules define when individuals are on-call and can be used in escalation paths.
1. Head to [Schedules](https://app.incident.io/~/on-call/schedules)
2. Create a new schedule or import it from your previous tool
3. Configure your schedule suited for your team:
4. **Handover times** (e.g., every Monday at 9 AM)
5. **Active hours** (e.g., all day or just during business hours)
6. **On-call individuals** (by default we'll add everyone on your team)
7. **Additional rotas**, like
8. **Follow-the-sun** for 24-hour global coverage.
9. **Shadowing for** onboarding new on-call members.
You can also structure your Catalog using **Services** or any custom type instead of teams. Learn more about Catalog powered On-call [here](/on-call/catalog-integration).
## 2. Building a Schedule
Next, create a schedule for your team. Schedules define when individuals are on-call and can be used in escalation paths.
1. Head to [Schedules](https://app.incident.io/~/on-call/schedules)
2. Create a new schedule or import it from your previous tool
3. Configure your schedule suited for your team:
4. **Handover times** (e.g., every Monday at 9 AM)
5. **Active hours** (e.g., all day or just during business hours)
6. **On-call individuals** (by default we'll add everyone on your team)
7. **Additional rotas**, like
8. **Follow-the-sun** for 24-hour global coverage.
9. **Shadowing for** onboarding new on-call members.
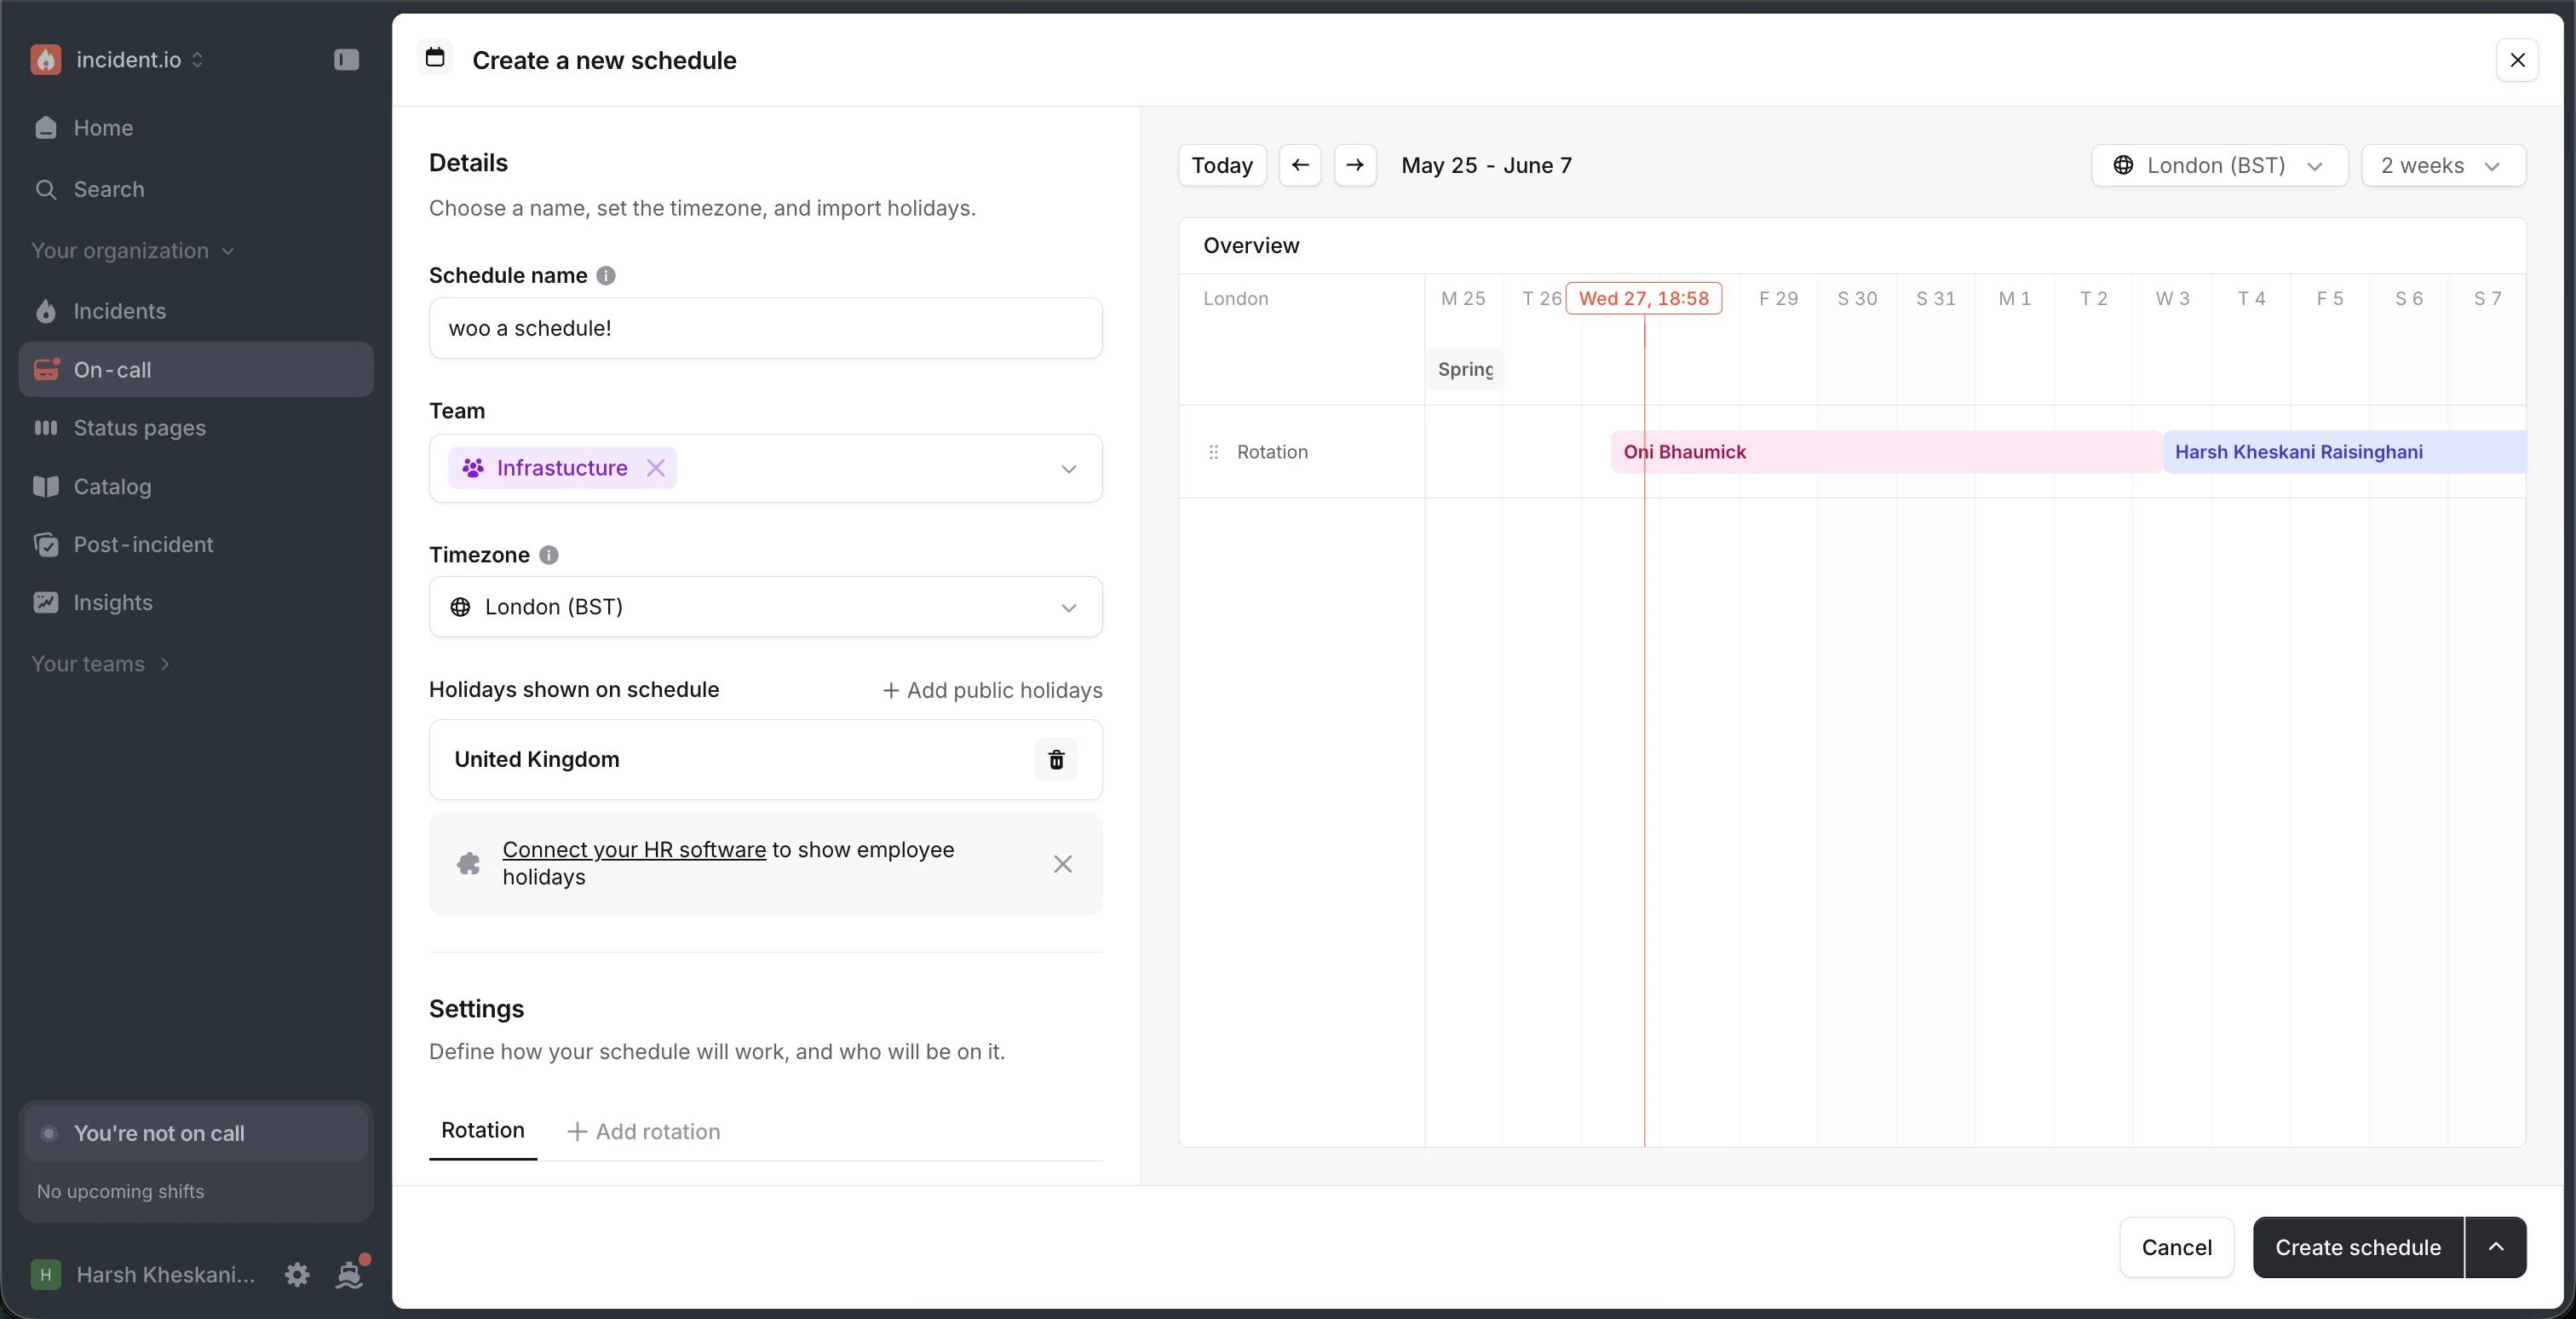 Overrides can be created in the schedule's detail view, from the **Schedules** tab, or by using `/inc cover` in Slack. Learn more about Schedules [here](/on-call/building-schedules).
## 3. Configuring an Escalation path
Escalation paths define who to notify and in what order when alerts occur.
1. Head to [Escalation paths](https://app.incident.io/~/on-call/escalation-paths)
2. Create a new Escalation path and name it
3. Connect your path to the team that should route to it
4. Set up the path with
* **Who to notify at each level** (which can be schedules, individuals or Slack channels).
* **Notification timing** (how long to wait before escalating to the next level)
* **Repeat options** (how many times to retry if the alert goes unacknowledged)
Overrides can be created in the schedule's detail view, from the **Schedules** tab, or by using `/inc cover` in Slack. Learn more about Schedules [here](/on-call/building-schedules).
## 3. Configuring an Escalation path
Escalation paths define who to notify and in what order when alerts occur.
1. Head to [Escalation paths](https://app.incident.io/~/on-call/escalation-paths)
2. Create a new Escalation path and name it
3. Connect your path to the team that should route to it
4. Set up the path with
* **Who to notify at each level** (which can be schedules, individuals or Slack channels).
* **Notification timing** (how long to wait before escalating to the next level)
* **Repeat options** (how many times to retry if the alert goes unacknowledged)
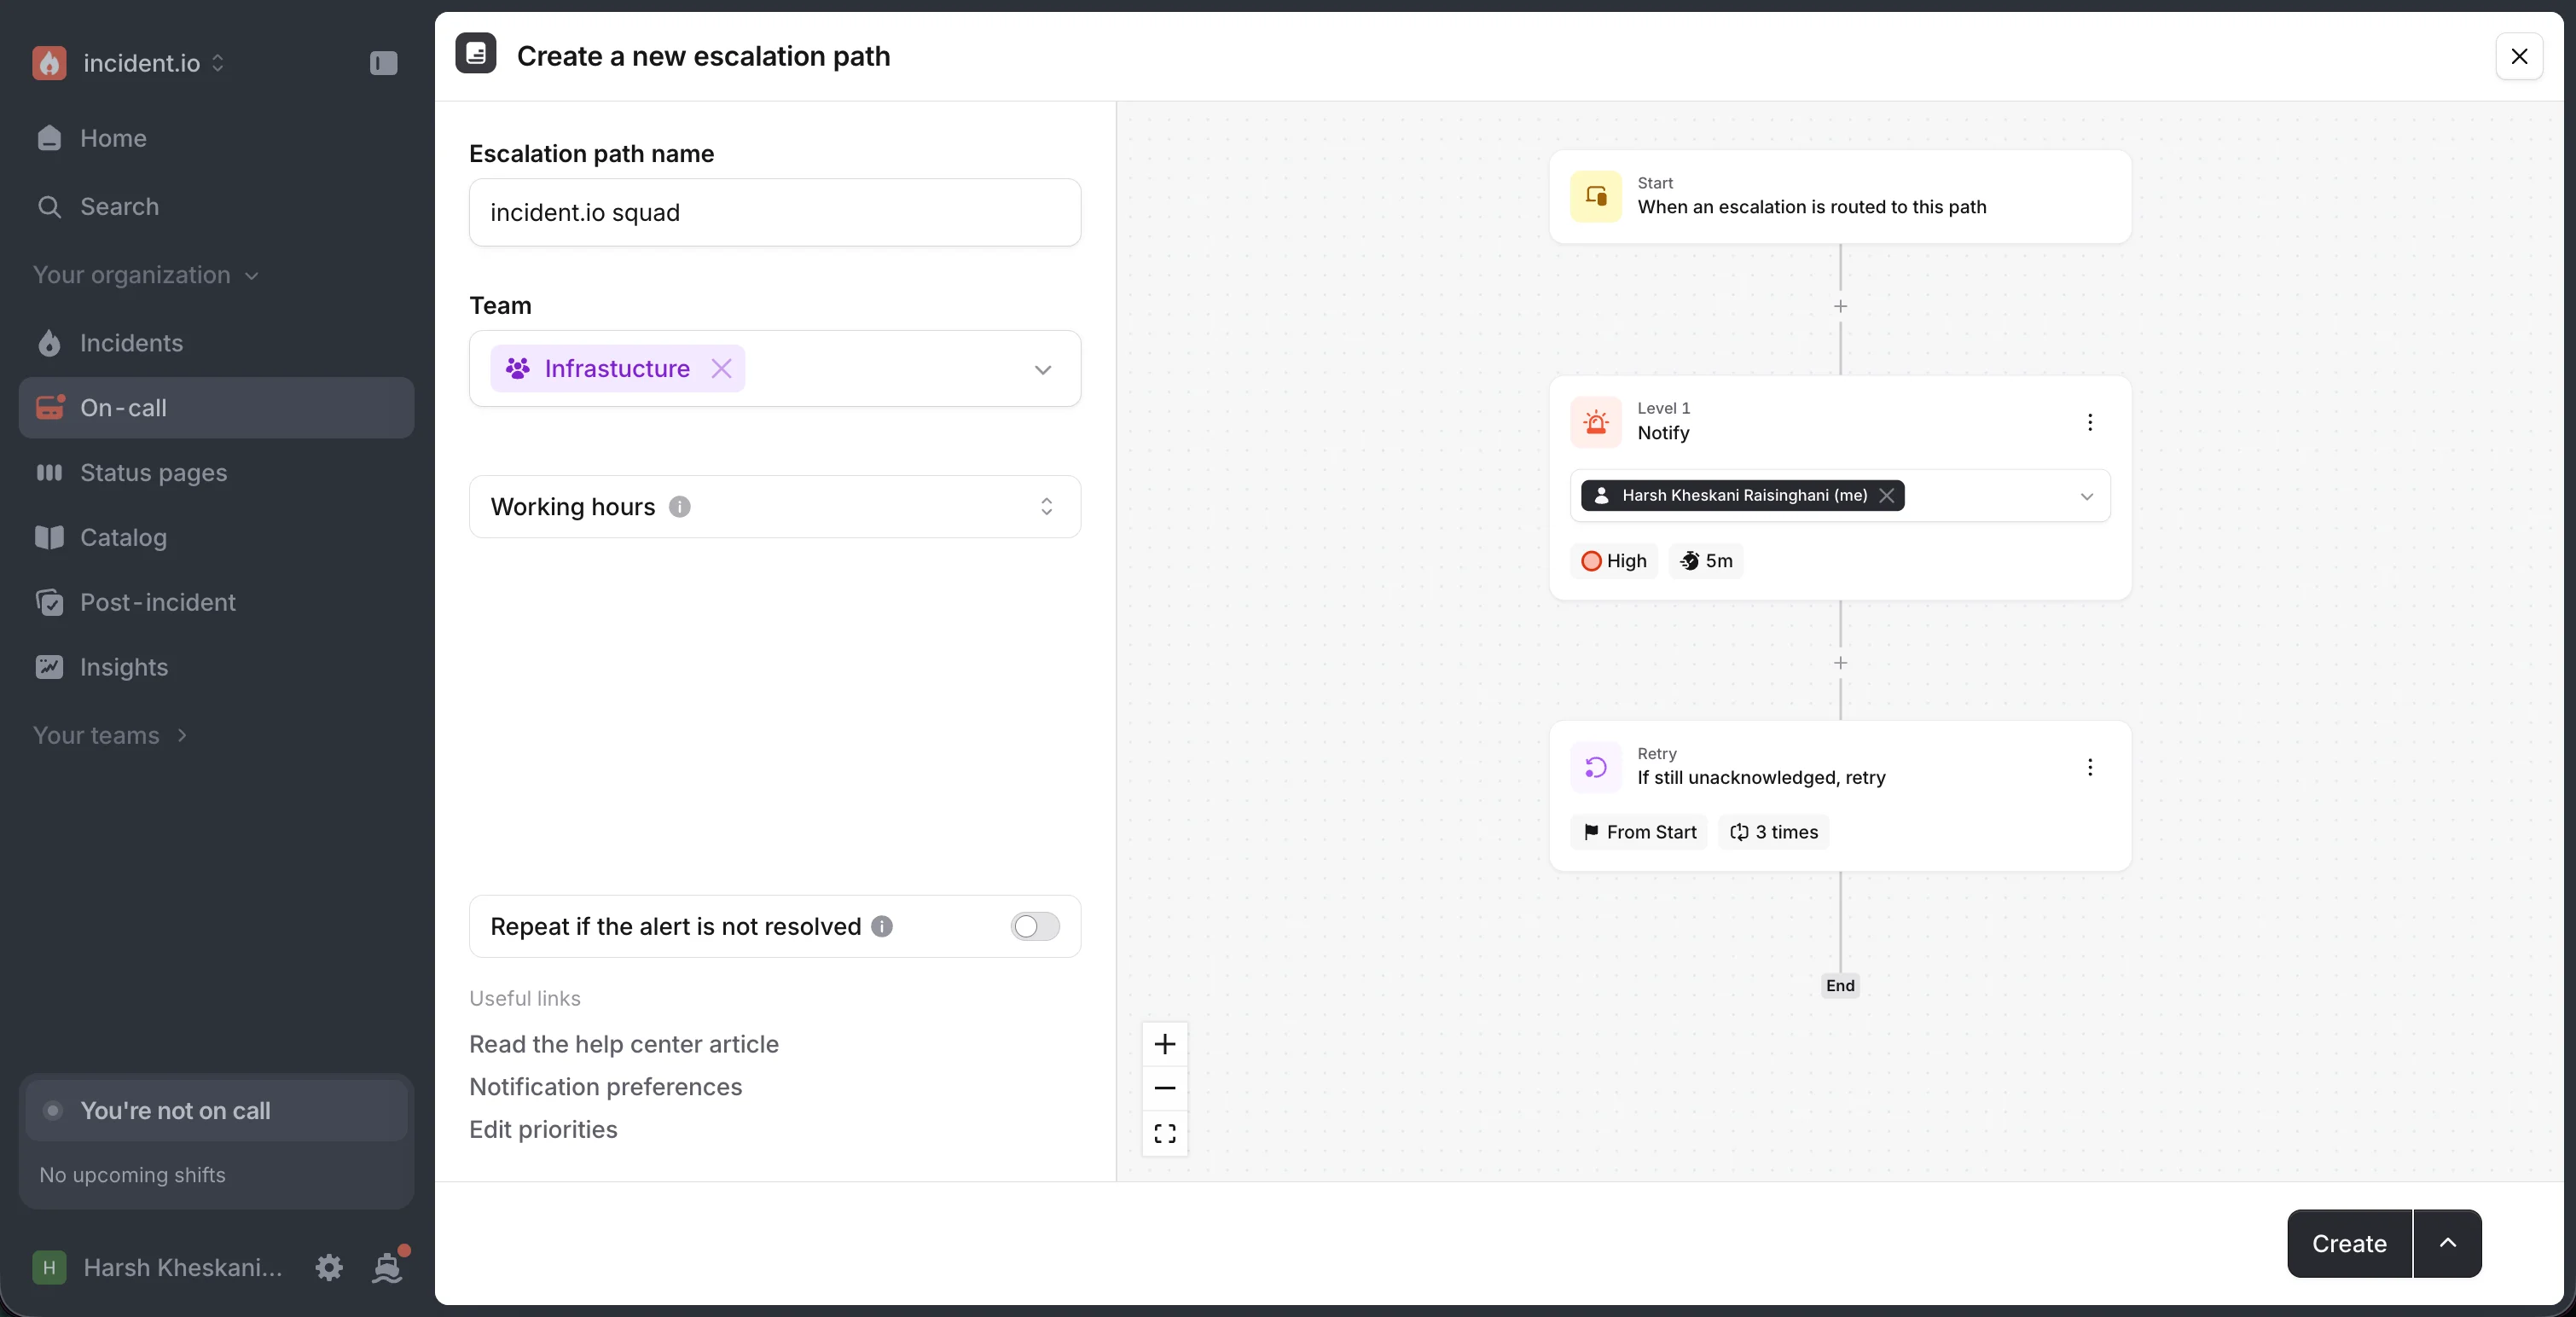 Customize escalation paths further with working hours, priorities, or round-robin notifications. Learn more about Escalation paths [here](/on-call/escalation-paths).
## 4. Creating incidents from alerts
Finally, bring in alerts from your observability tools and route them to page your teams and create incidents automatically.
Customize escalation paths further with working hours, priorities, or round-robin notifications. Learn more about Escalation paths [here](/on-call/escalation-paths).
## 4. Creating incidents from alerts
Finally, bring in alerts from your observability tools and route them to page your teams and create incidents automatically.
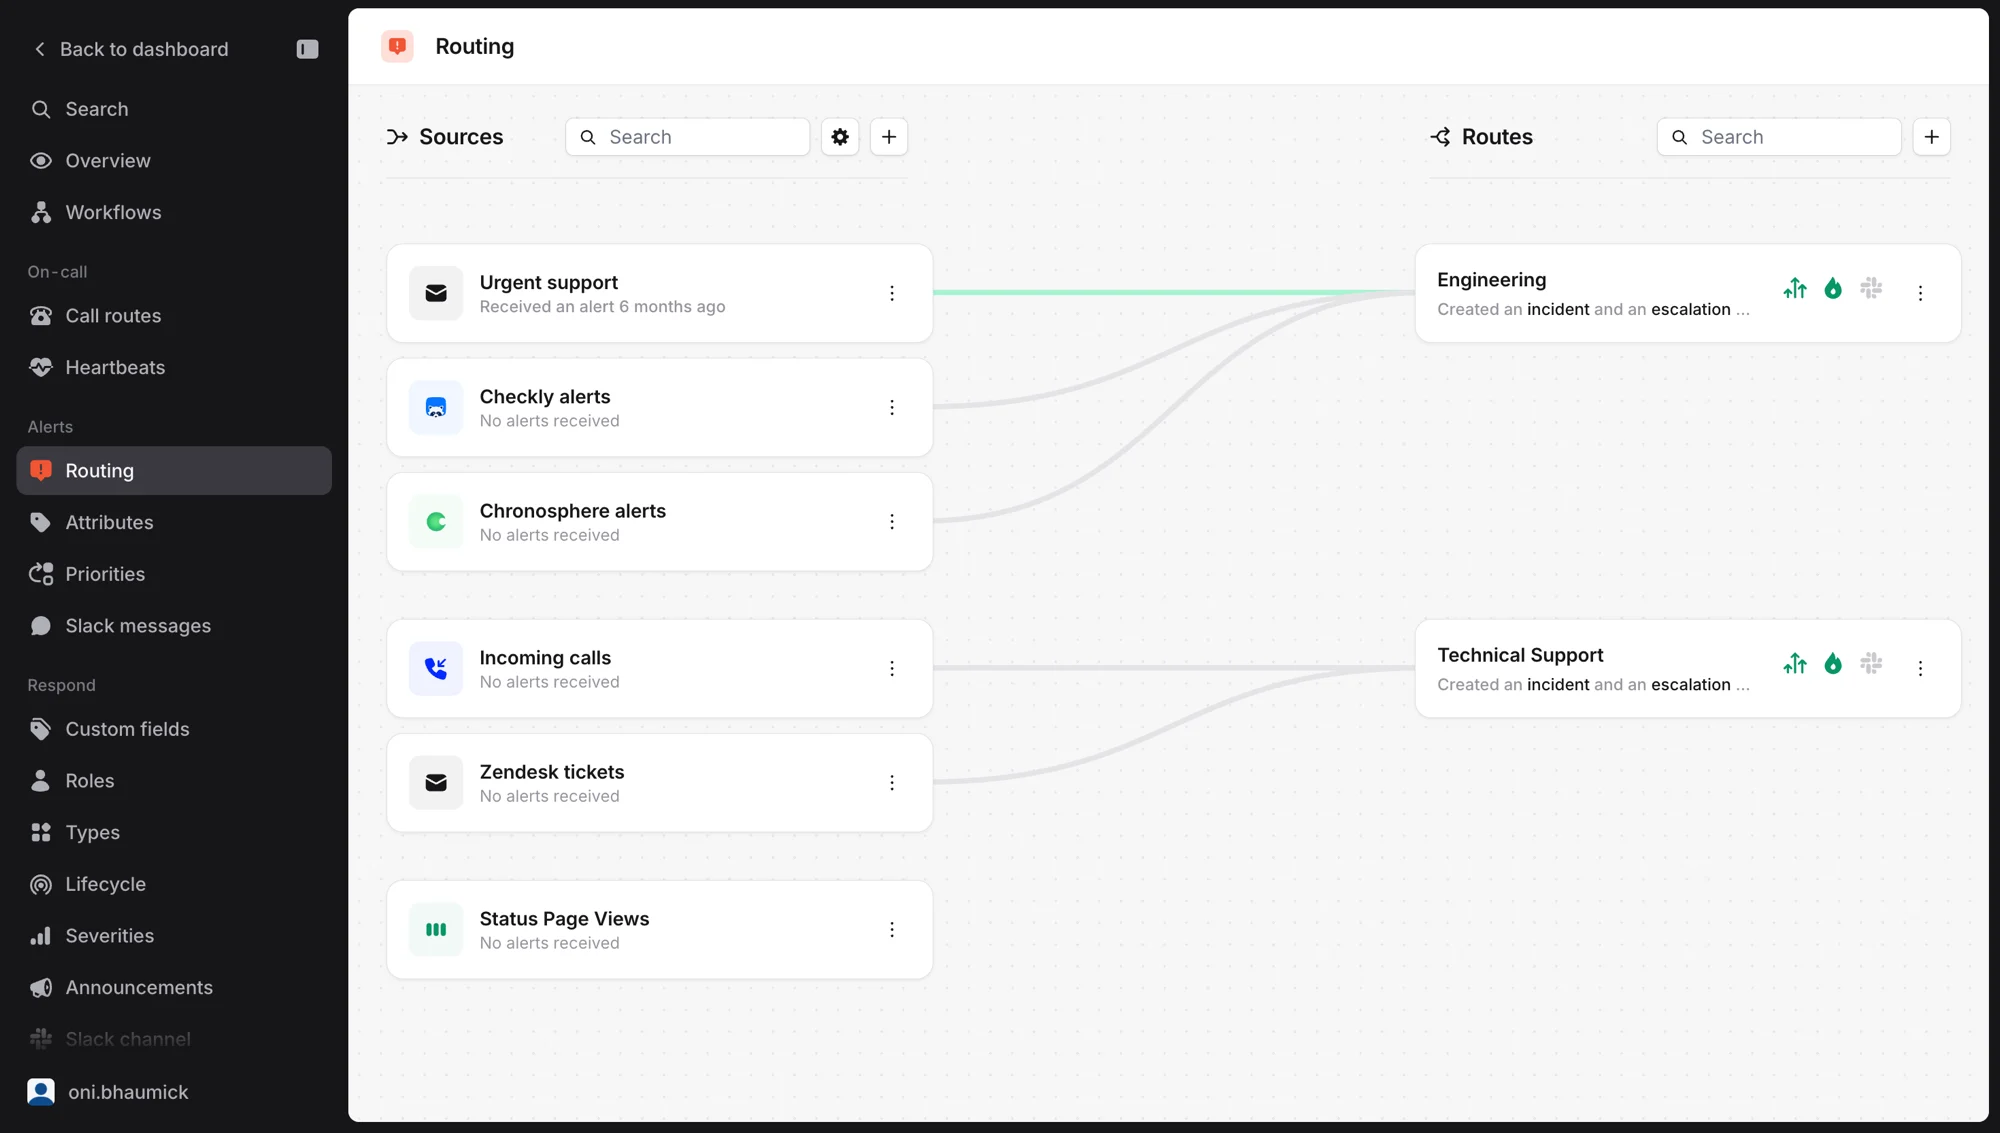 ### Connecting your alert source
1. Head to [Alert Configuration](https://app.incident.io/~/alerts/configuration)
2. Choose your alert source
3. If there's no direct integration available for your source, connect via HTTP.
4. Follow the instructions to connect your source, and send your first test alert.
5. Configure your alert attributes and priority using our AI suggestions
* Choose to use **attributes** or **priority** from the alert payload or set them as a **static field**
* Make sure to have an attribute which will tell your alert who it should page. If you page by Team, you can always navigate from a team to its escalation paths. If you page by something else like Service, your alert should be able to resolve to an escalation path via Catalog.
### Connecting your alert source
1. Head to [Alert Configuration](https://app.incident.io/~/alerts/configuration)
2. Choose your alert source
3. If there's no direct integration available for your source, connect via HTTP.
4. Follow the instructions to connect your source, and send your first test alert.
5. Configure your alert attributes and priority using our AI suggestions
* Choose to use **attributes** or **priority** from the alert payload or set them as a **static field**
* Make sure to have an attribute which will tell your alert who it should page. If you page by Team, you can always navigate from a team to its escalation paths. If you page by something else like Service, your alert should be able to resolve to an escalation path via Catalog.
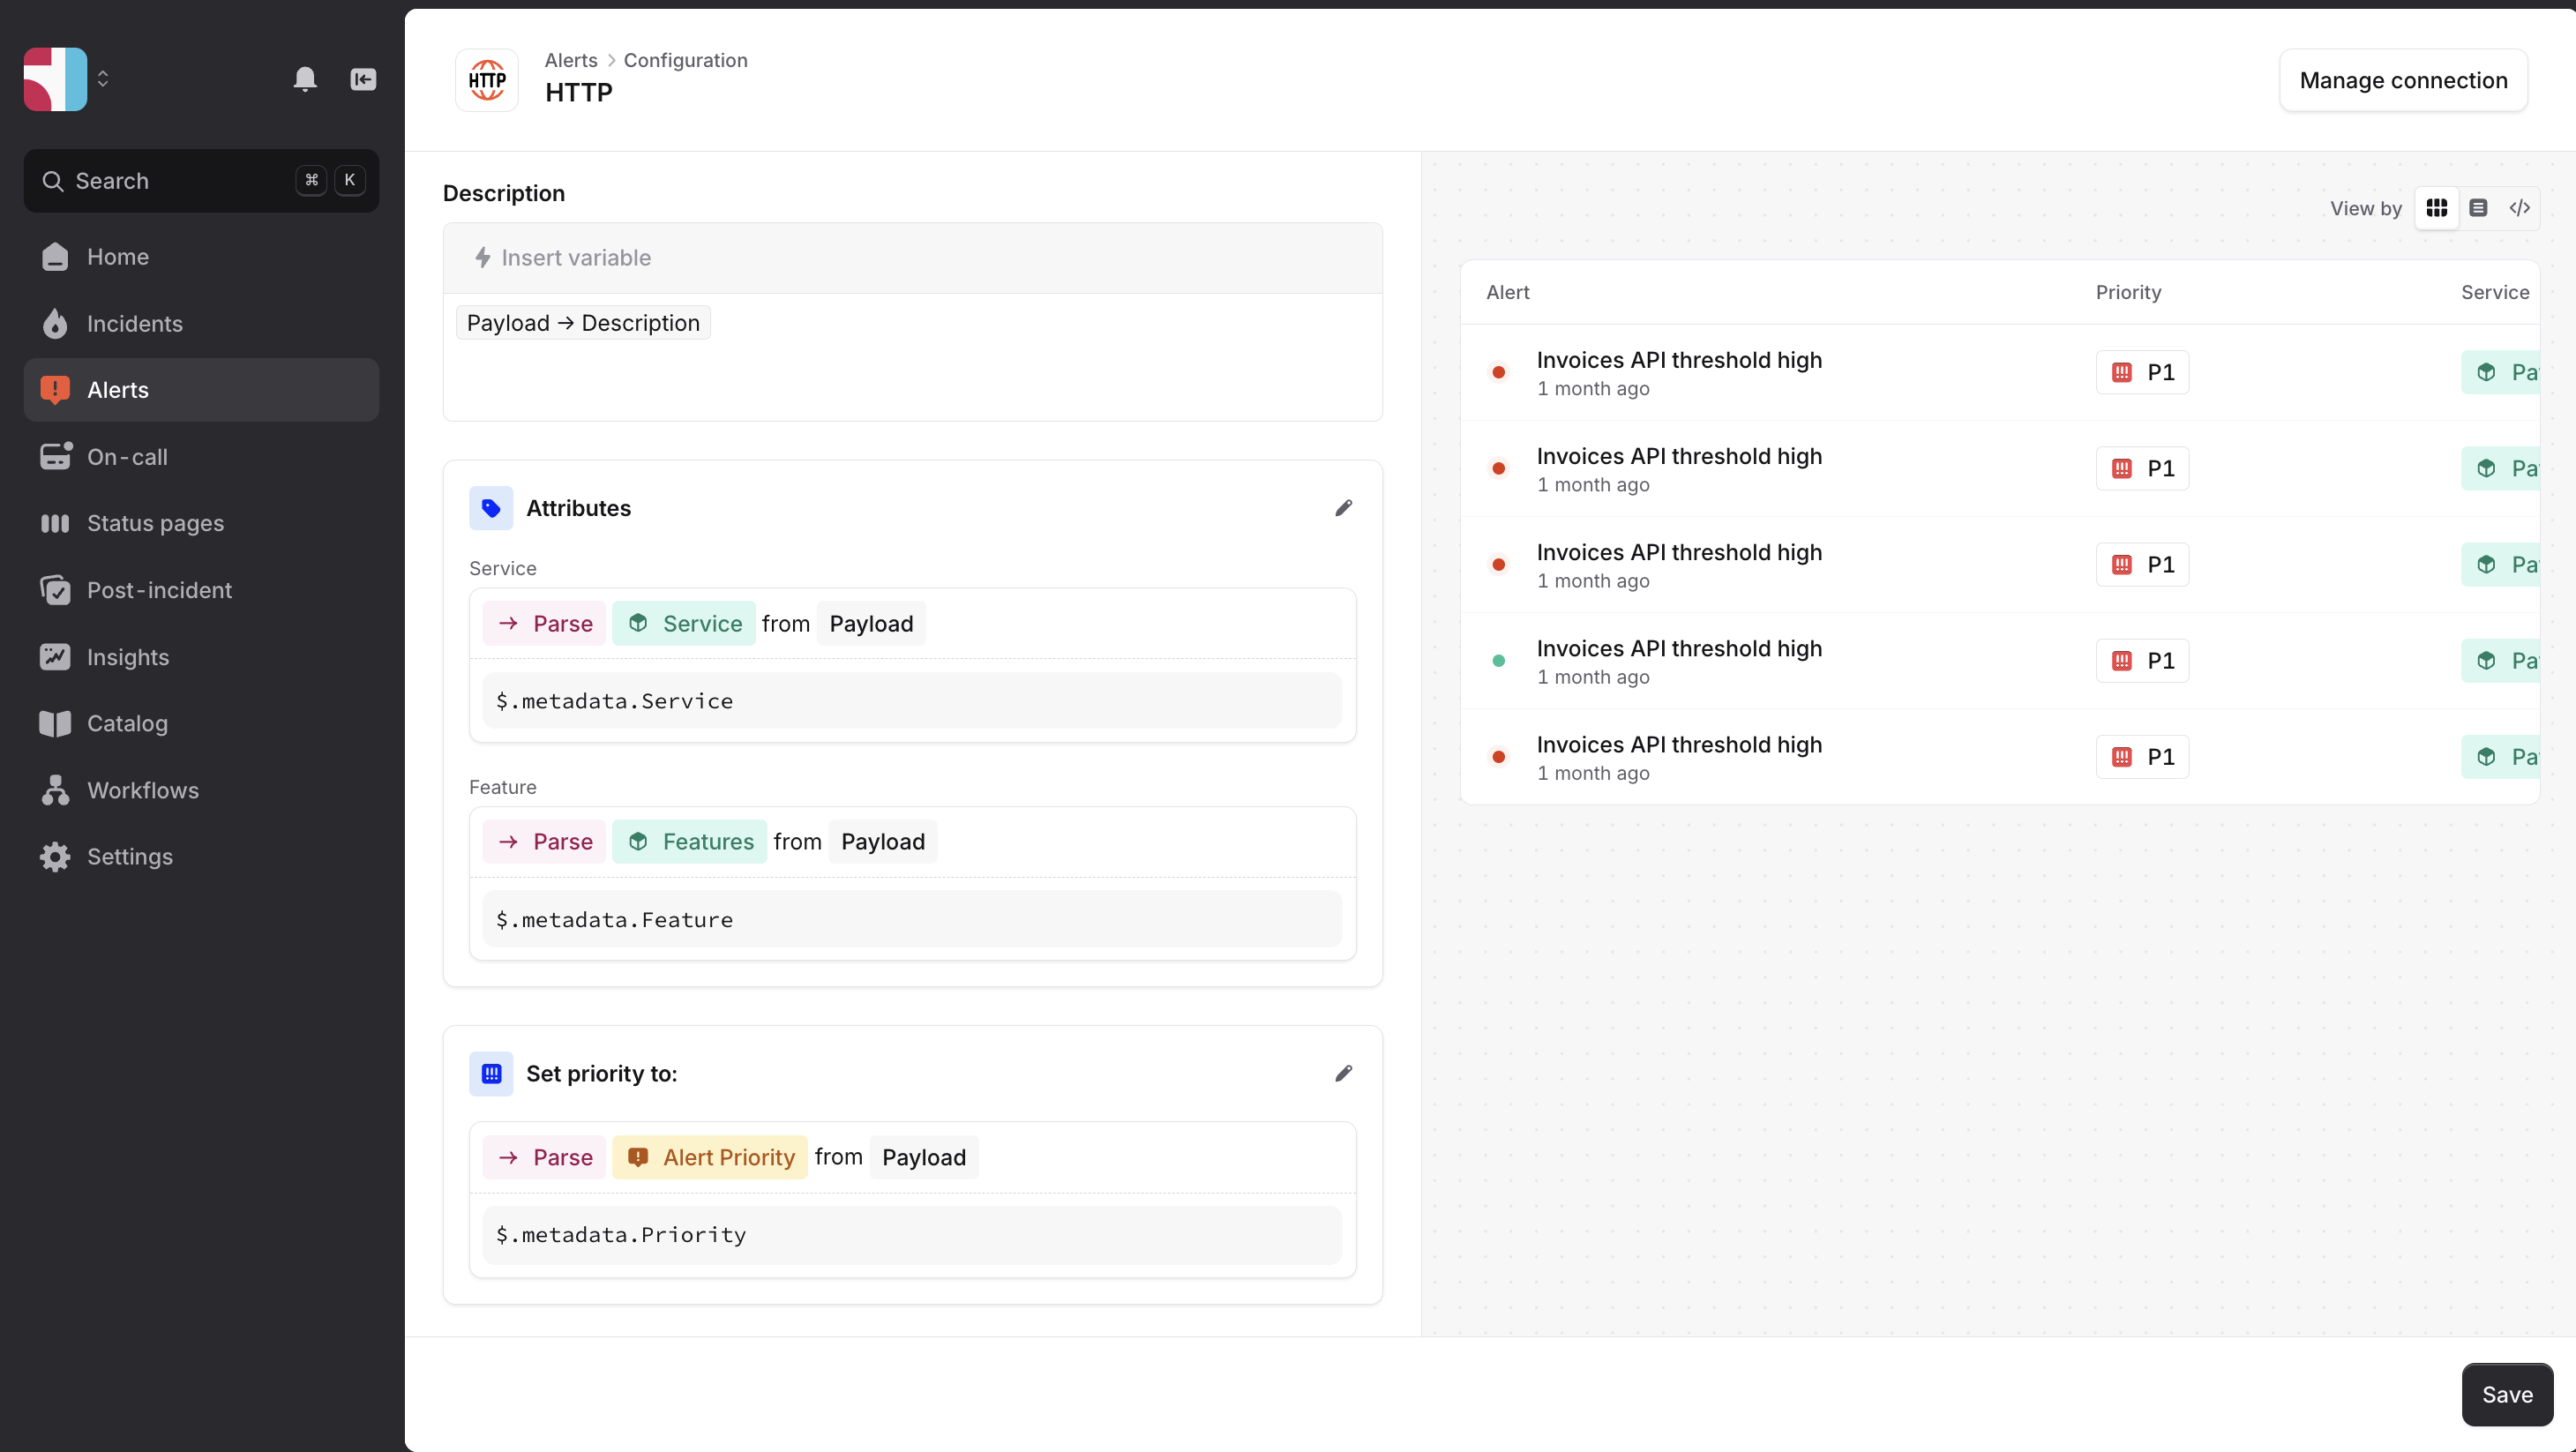 **Attributes** provide extra context to your alerts, like services, affected features, or environments. Learn more about Attributes [here](/alerts/getting-started) and Priorities [here](/on-call/priority-urgency-severity).
### Routing your alerts to start escalating and creating incidents
Now set up your alert routes to escalate and create incidents automatically.
1. Create a new Alert route in [Alert configuration](https://app.incident.io/~/alerts/routes/create)
2. Select the sources you want to include
3. Filter the alerts you want or don't want to trigger incidents
4. Enable Escalations, choosing either
* **Dynamic escalation** paths based on your team or service attribute (recommended), or
* **Static paths** to use the same escalation path for all alerts
5. Enable incident creation
* Automatically create incidents or filter which alerts should trigger them.
* Configure **grouping** so similar alerts are handled together \[ [Learn more](/alerts/grouping-alerts) ]
* You can also choose Mode=Test to create test incidents
**Attributes** provide extra context to your alerts, like services, affected features, or environments. Learn more about Attributes [here](/alerts/getting-started) and Priorities [here](/on-call/priority-urgency-severity).
### Routing your alerts to start escalating and creating incidents
Now set up your alert routes to escalate and create incidents automatically.
1. Create a new Alert route in [Alert configuration](https://app.incident.io/~/alerts/routes/create)
2. Select the sources you want to include
3. Filter the alerts you want or don't want to trigger incidents
4. Enable Escalations, choosing either
* **Dynamic escalation** paths based on your team or service attribute (recommended), or
* **Static paths** to use the same escalation path for all alerts
5. Enable incident creation
* Automatically create incidents or filter which alerts should trigger them.
* Configure **grouping** so similar alerts are handled together \[ [Learn more](/alerts/grouping-alerts) ]
* You can also choose Mode=Test to create test incidents
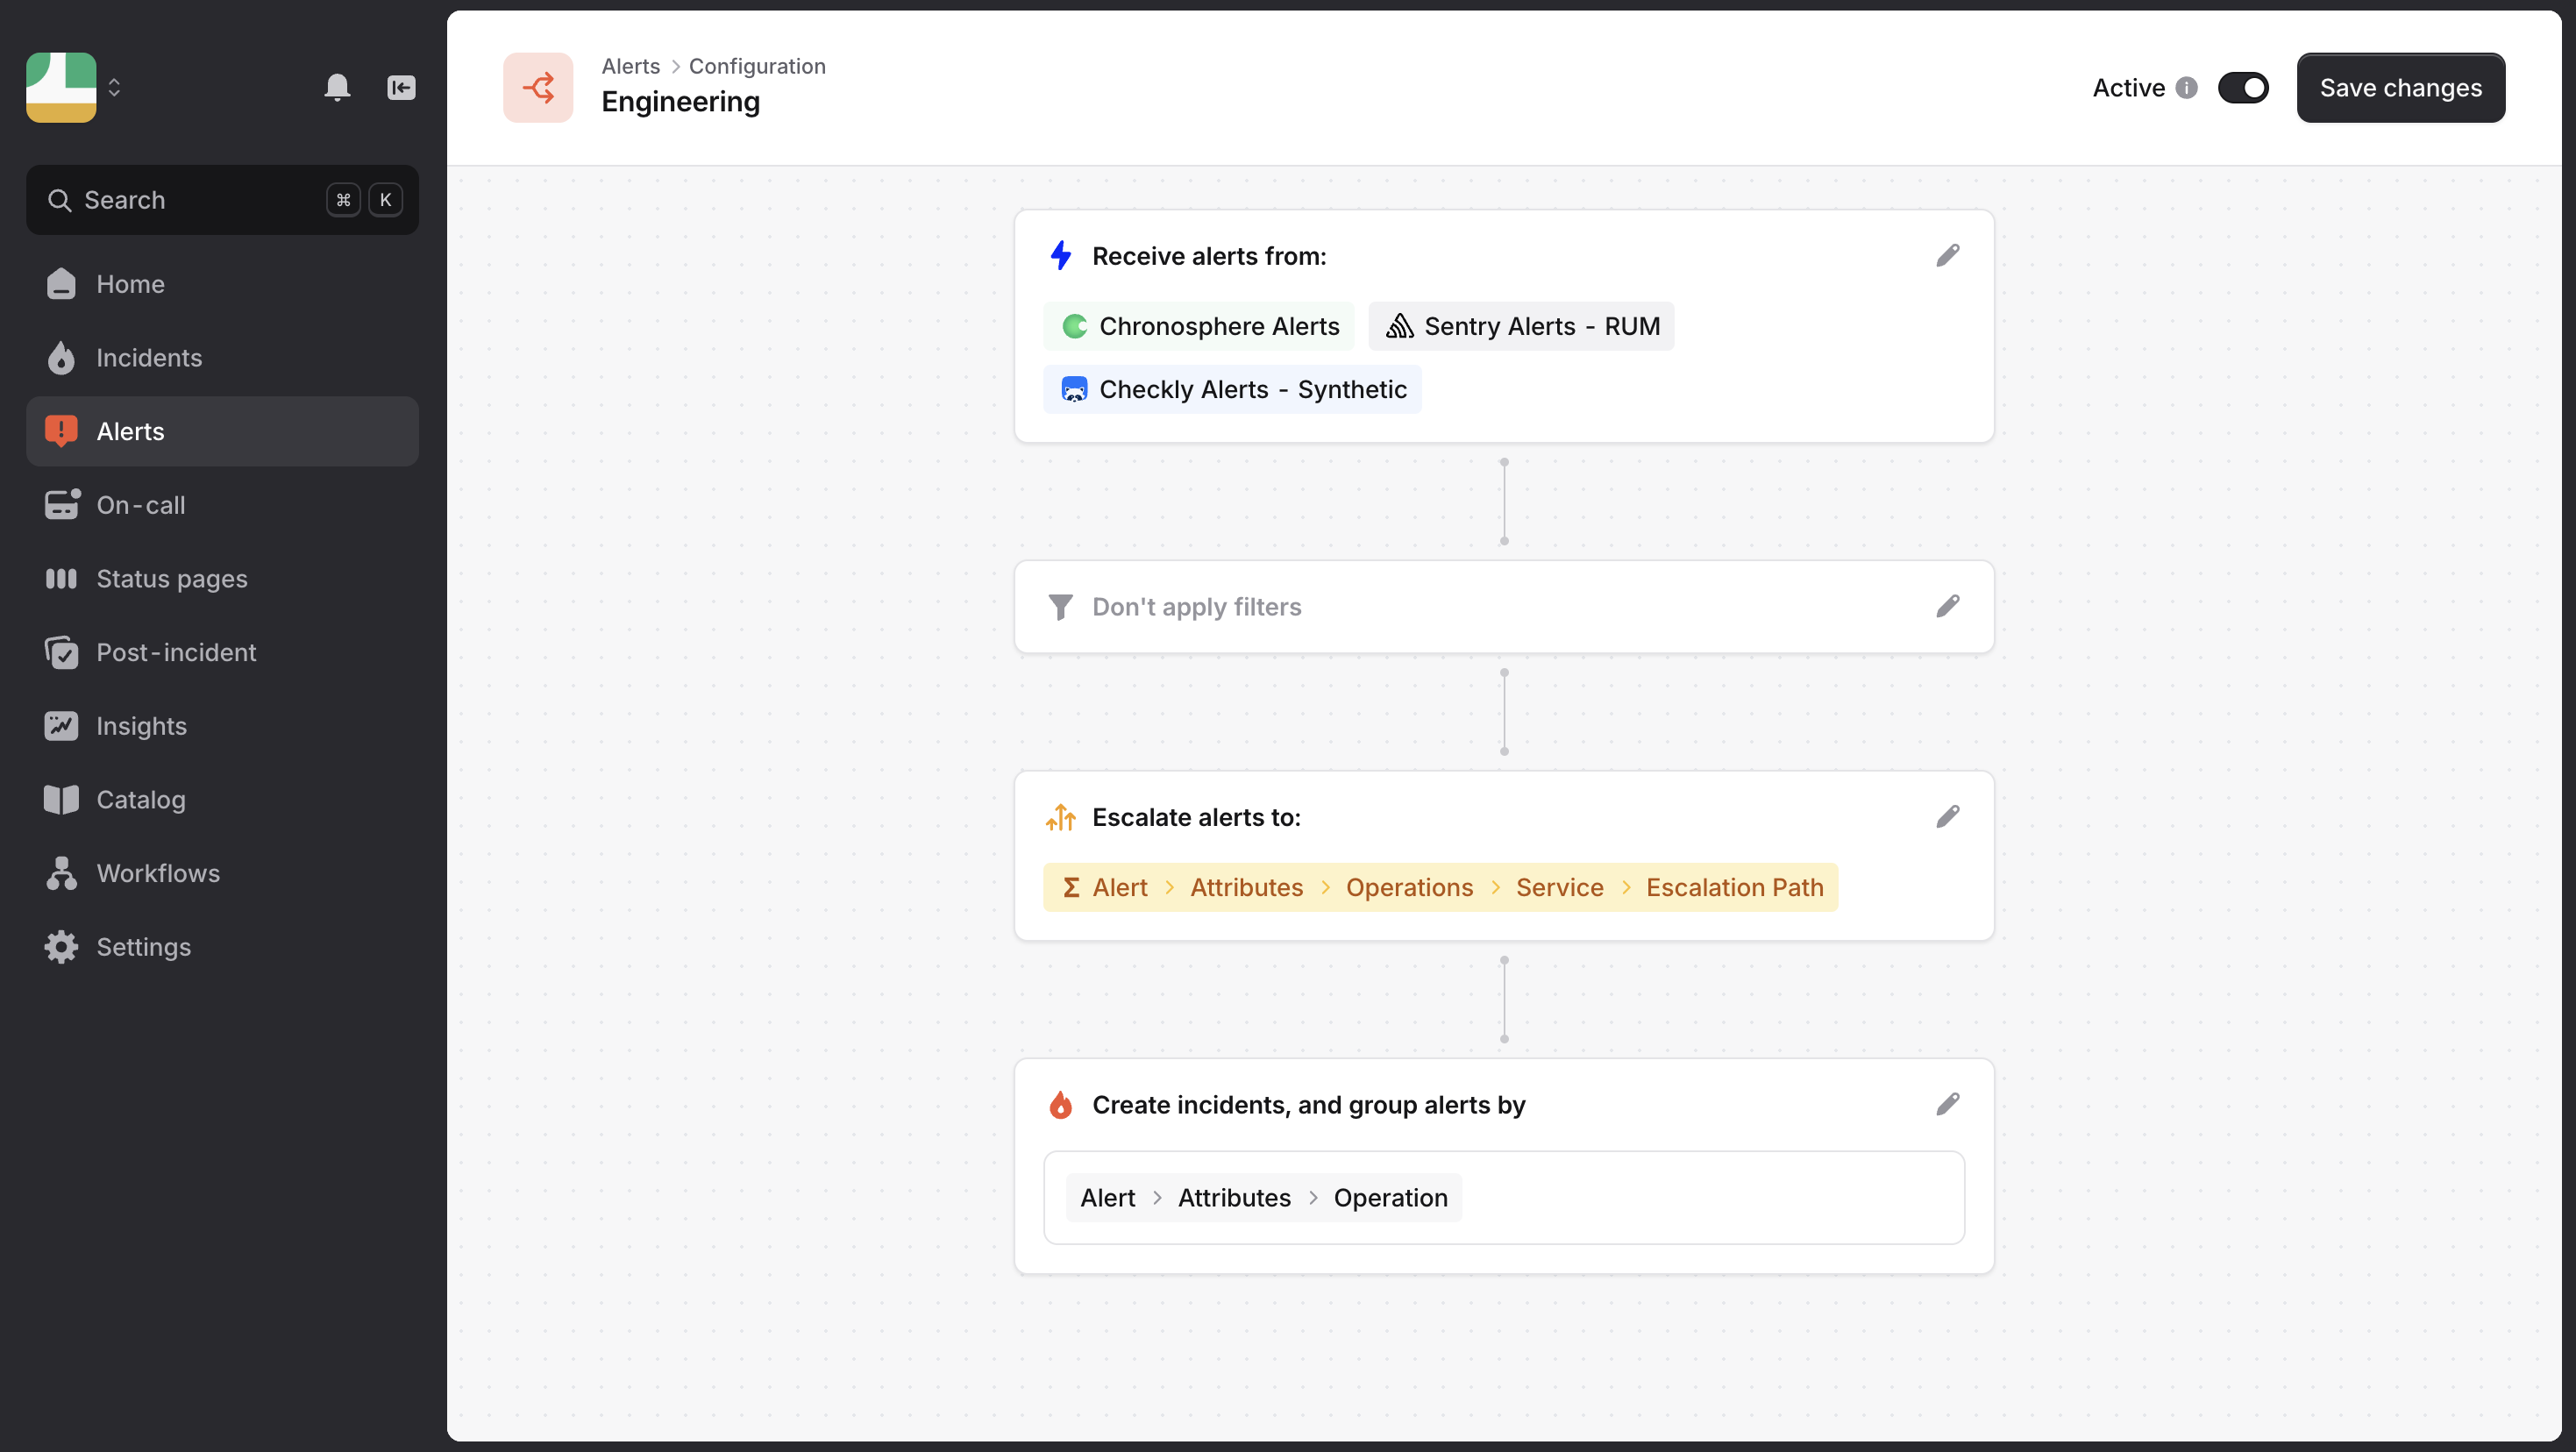 No need to create a route for each team! See best practices for alert routing here. Learn more about Alert configuration [here](/alerts/getting-started).
## 5. Creating incidents manually
Alerts might create most of your incidents, but for example, customer-facing teams might need to raise incidents manually. To ensure your customer-facing teams don't need to know the specific teams who own a feature, we'll use the Catalog to escalate to the right team based on the feature. Here's how to help them create incidents and automatically page the right people!
1. Head to the [Catalog](https://app.incident.io/~/catalog) and create a new type like Features.
2. Go to Settings and [Custom fields](https://app.incident.io/~/settings/custom-fields) to create a Custom field ie 'Affected Features'
3. Then go to [Forms](https://app.incident.io/~/settings/forms), 'Declare' and add 'Feature' to the form
4. Then head to Workflows and create a new workflow
* Choose the template 'Escalate via incident.io'
* Edit the step 'Escalate via incident.io and create an expression that navigates from the Feature to the Escalation path
5. Save draft and set live!
Now when someone manually creates an incident, we'll ask what features are affected and then escalate the incident to the right people.
You can also edit the Escalation form that comes when you use the command `/inc escalate`. Find more specific instructions for configuring manual paging [here](/on-call/manual-escalation).
***
## Start testing
Everything’s ready! Send some test alerts to see how your on-call setup works. You can disable escalations or incidents in the alert route during testing if needed.
**Read more about**
[Migrating to incident.io: On-call readiness](/on-call/on-call-readiness-insights)
[Responder set up](/on-call/responder-guide)
When responders are added to a schedule or escalation path, they’ll automatically receive notifications to set up their on-call configuration with sensible default settings.
If you have any questions or concerns about configuring your on-call program, please message us via your Slack Connect channel, or at [help@incident.io](mailto:help@incident.io).
No need to create a route for each team! See best practices for alert routing here. Learn more about Alert configuration [here](/alerts/getting-started).
## 5. Creating incidents manually
Alerts might create most of your incidents, but for example, customer-facing teams might need to raise incidents manually. To ensure your customer-facing teams don't need to know the specific teams who own a feature, we'll use the Catalog to escalate to the right team based on the feature. Here's how to help them create incidents and automatically page the right people!
1. Head to the [Catalog](https://app.incident.io/~/catalog) and create a new type like Features.
2. Go to Settings and [Custom fields](https://app.incident.io/~/settings/custom-fields) to create a Custom field ie 'Affected Features'
3. Then go to [Forms](https://app.incident.io/~/settings/forms), 'Declare' and add 'Feature' to the form
4. Then head to Workflows and create a new workflow
* Choose the template 'Escalate via incident.io'
* Edit the step 'Escalate via incident.io and create an expression that navigates from the Feature to the Escalation path
5. Save draft and set live!
Now when someone manually creates an incident, we'll ask what features are affected and then escalate the incident to the right people.
You can also edit the Escalation form that comes when you use the command `/inc escalate`. Find more specific instructions for configuring manual paging [here](/on-call/manual-escalation).
***
## Start testing
Everything’s ready! Send some test alerts to see how your on-call setup works. You can disable escalations or incidents in the alert route during testing if needed.
**Read more about**
[Migrating to incident.io: On-call readiness](/on-call/on-call-readiness-insights)
[Responder set up](/on-call/responder-guide)
When responders are added to a schedule or escalation path, they’ll automatically receive notifications to set up their on-call configuration with sensible default settings.
If you have any questions or concerns about configuring your on-call program, please message us via your Slack Connect channel, or at [help@incident.io](mailto:help@incident.io).