> ## Documentation Index
> Fetch the complete documentation index at: https://docs.incident.io/llms.txt
> Use this file to discover all available pages before exploring further.
# Creating escalations and incidents from alerts
After you have connected your alert source, it's time to create alert routes.
Alert routes process incoming alerts, and determine:
1. How to route alerts to the correct escalation path
2. Which (if any) alerts should create incidents, as well as alert grouping behavior
## Creating a new Alert route
After you have connected your alert source, it's time to create one or more alert routes from it. Remember, you can bring data from multiple data sources to one route!
1. Head to Settings > Alerts
2. Create a new Alert Route, and give it a name
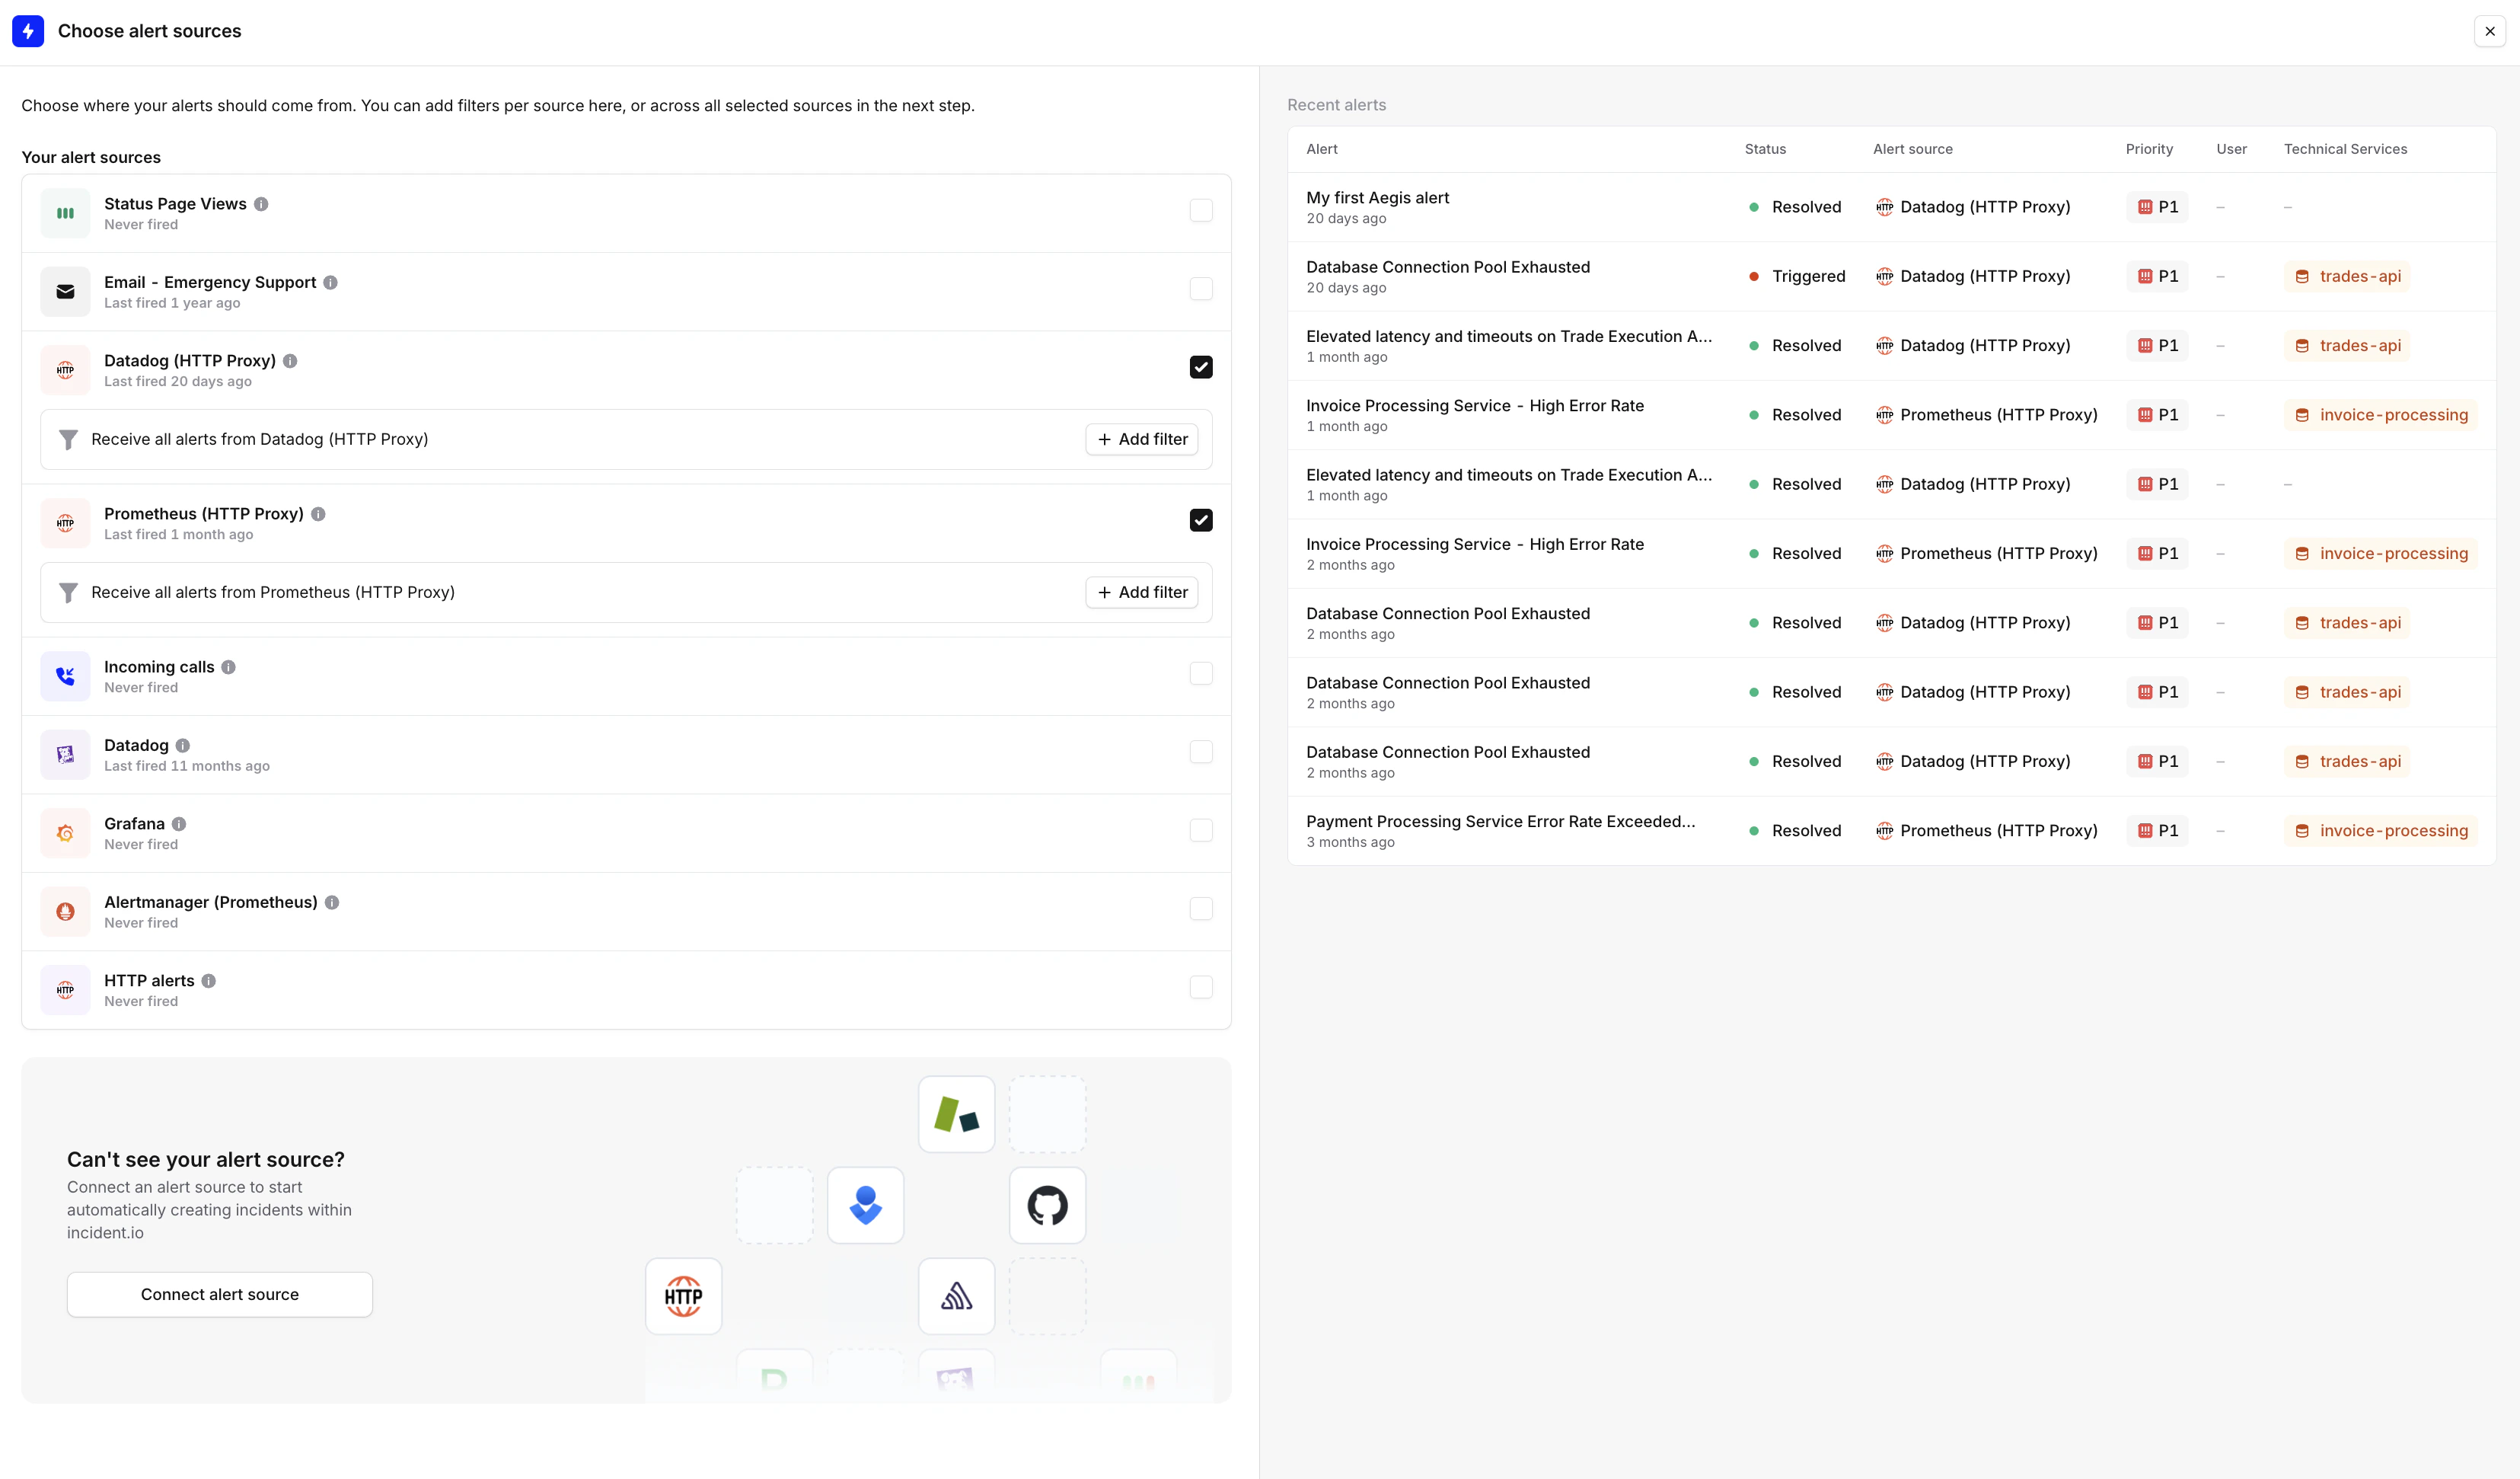
3. Choose the alert sources you want to bring to this route
4. Continue
 ## Filtering alerts
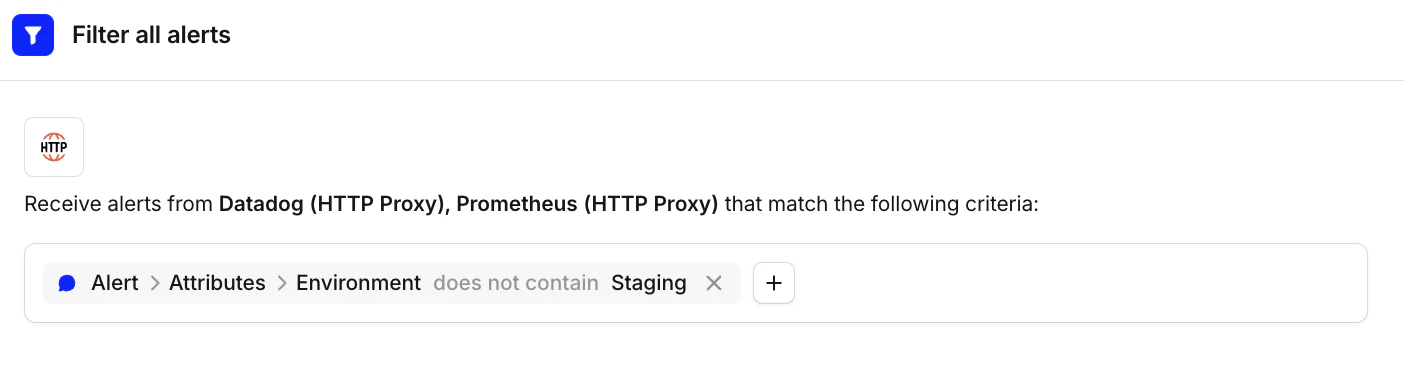
You can filter alerts out if they are irrelevant to your alert route. Any data from the alert's payload can be used to filter out alerts (leveraging [attributes](/alerts/attributes-and-priorities) ), as well as first-order filters like Source or Priority.
Example: Have an attribute on your alert to capture `Staging` versus `Production` environment, so you can filter out `Staging` alerts.
## Filtering alerts
You can filter alerts out if they are irrelevant to your alert route. Any data from the alert's payload can be used to filter out alerts (leveraging [attributes](/alerts/attributes-and-priorities) ), as well as first-order filters like Source or Priority.
Example: Have an attribute on your alert to capture `Staging` versus `Production` environment, so you can filter out `Staging` alerts.
 ## Grouping alerts
Group related alerts by time window and/or context (via attributes like service or team) to decrease noise from similar alerts and reduce alert fatigue. See [Alert grouping](/alerts/grouping-alerts) for how to set this up and how it behaves.
Catalog is where you can store your organization structure like services, teams, domains, features, integrations etc. This is what makes Alerts powerful for you to create a configuration that is efficient and alerts in the right way and time. You can read more [about Catalog here](/catalog/catalog-setup).
## Creating escalations from an alert route
You can choose whether you want to page people for your incoming alerts.
Alerts can be escalated to [Escalation paths](https://app.incident.io/~/on-call/escalation-paths), users, or a combination thereof.
You can either point directly to a specific Escalation Path or user; or (which we recommend!), leverage [Expressions](https://www.loom.com/share/59694b3eb37c4ba6a787fa279fb363d1?sid=3307d250-3e30-4b8c-97e6-33b2ca2b44c6) to dynamically pick the right Escalation Path depending on the alert's context.
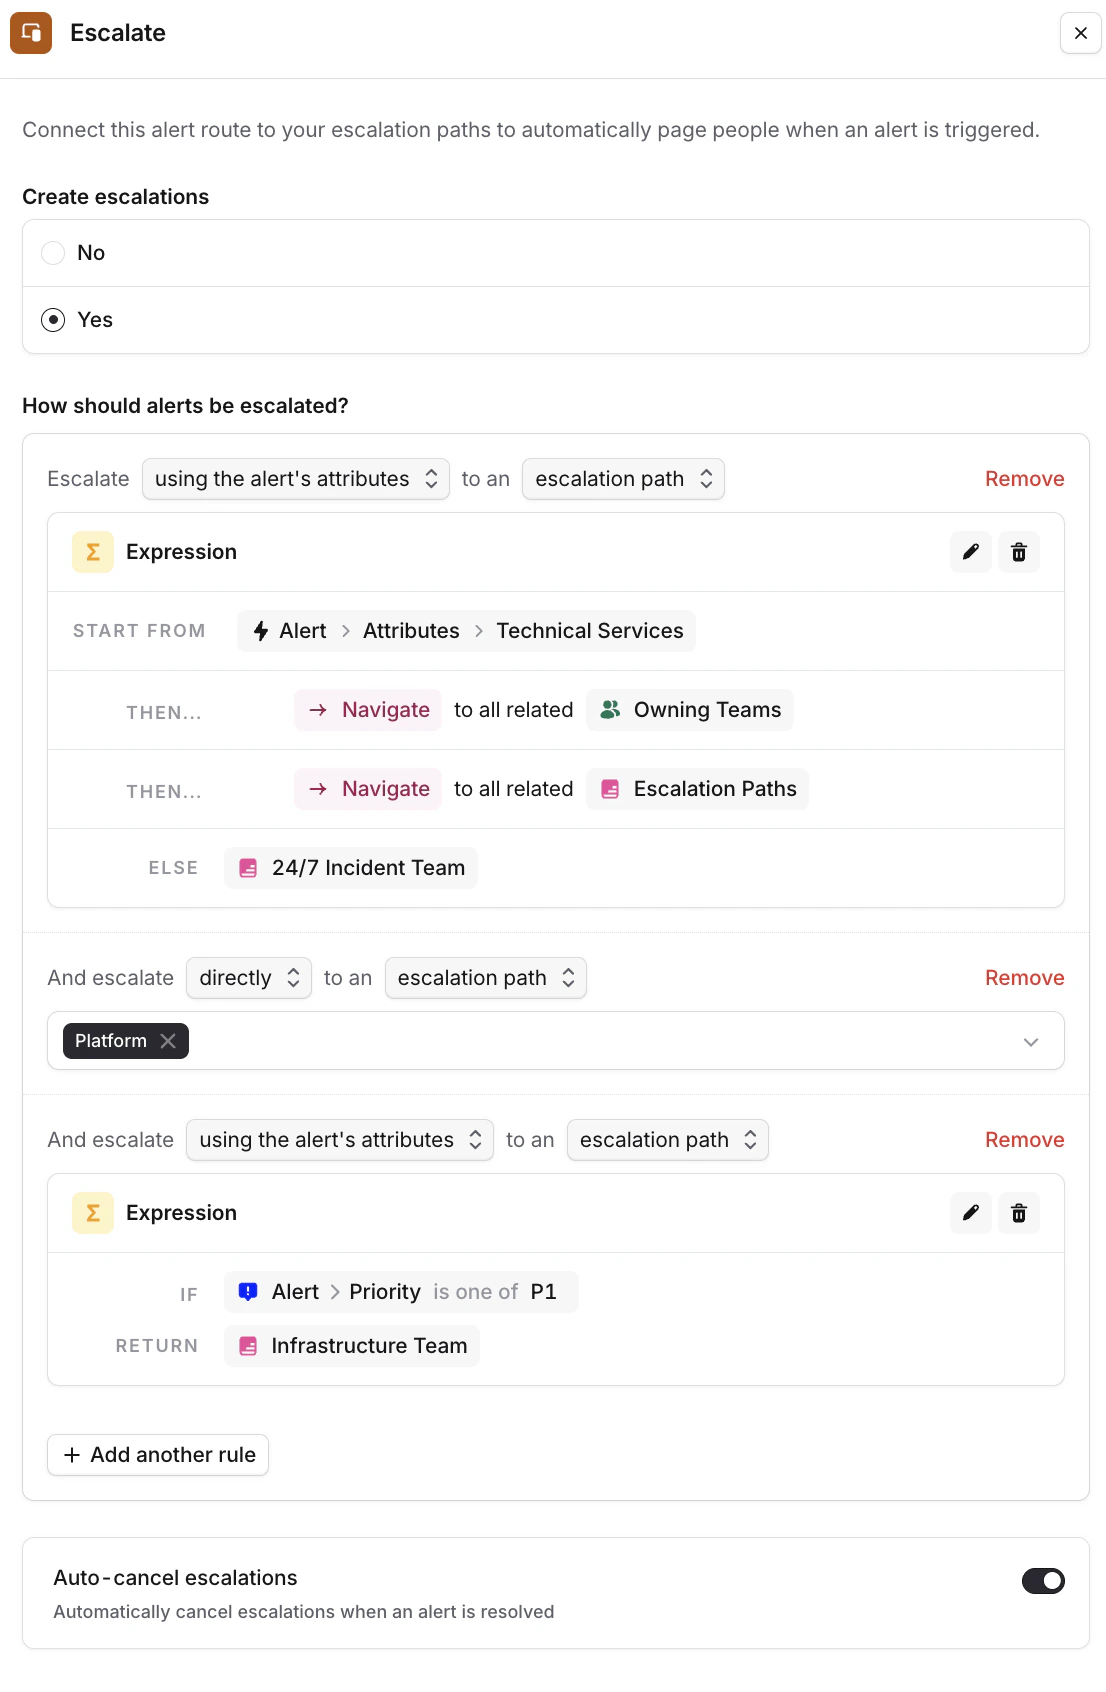
1. Go to the Alert Route > Set Escalate alert to "Yes"
2. Choose the escalation path(s) you'd like to page (we recommend leveraging a query-based expression to pick the right Path based on e.g. the impacted Service or Team on the alert)
3. Optionally, you can stack multiple escalation rules (for example, "Escalate to the Team labeled against the alert, AND escalate to the Infrastructure team if alert priority = P1")
4. Toggle on auto-cancel escalations if you wish to cancel pages when an alert is resolved (this is useful for flappy alert sources)
## Grouping alerts
Group related alerts by time window and/or context (via attributes like service or team) to decrease noise from similar alerts and reduce alert fatigue. See [Alert grouping](/alerts/grouping-alerts) for how to set this up and how it behaves.
Catalog is where you can store your organization structure like services, teams, domains, features, integrations etc. This is what makes Alerts powerful for you to create a configuration that is efficient and alerts in the right way and time. You can read more [about Catalog here](/catalog/catalog-setup).
## Creating escalations from an alert route
You can choose whether you want to page people for your incoming alerts.
Alerts can be escalated to [Escalation paths](https://app.incident.io/~/on-call/escalation-paths), users, or a combination thereof.
You can either point directly to a specific Escalation Path or user; or (which we recommend!), leverage [Expressions](https://www.loom.com/share/59694b3eb37c4ba6a787fa279fb363d1?sid=3307d250-3e30-4b8c-97e6-33b2ca2b44c6) to dynamically pick the right Escalation Path depending on the alert's context.
1. Go to the Alert Route > Set Escalate alert to "Yes"
2. Choose the escalation path(s) you'd like to page (we recommend leveraging a query-based expression to pick the right Path based on e.g. the impacted Service or Team on the alert)
3. Optionally, you can stack multiple escalation rules (for example, "Escalate to the Team labeled against the alert, AND escalate to the Infrastructure team if alert priority = P1")
4. Toggle on auto-cancel escalations if you wish to cancel pages when an alert is resolved (this is useful for flappy alert sources)
 If an alert isn't part of a [group](/alerts/grouping-alerts) and its priority increases after it's already been escalated (for example, your monitoring tool sends an updated version of the same alert at a higher priority), we'll automatically trigger a new escalation to reflect the increase. Grouped alerts have their own equivalent setting for escalating **on priority increase**, described in [Alert grouping](/alerts/grouping-alerts).
## Creating incidents
You can choose exactly when and how you want to create incidents, and what type of incident, when alerts are received.
Note: We recommend declaring Triage incidents alongside your paging, as this allows your team to have a dedicated spot to collaborate, and if your team decides this is not an incident, you can simply decline it! Otherwise, if this turns into a real incident you already have all your troubleshooting context in the Slack channel.
To skip triage and create incidents that are immediately active, select **Active** as the starting status. This is
useful for high-confidence alerts that don't need manual confirmation.
1. Go to the Incident Details
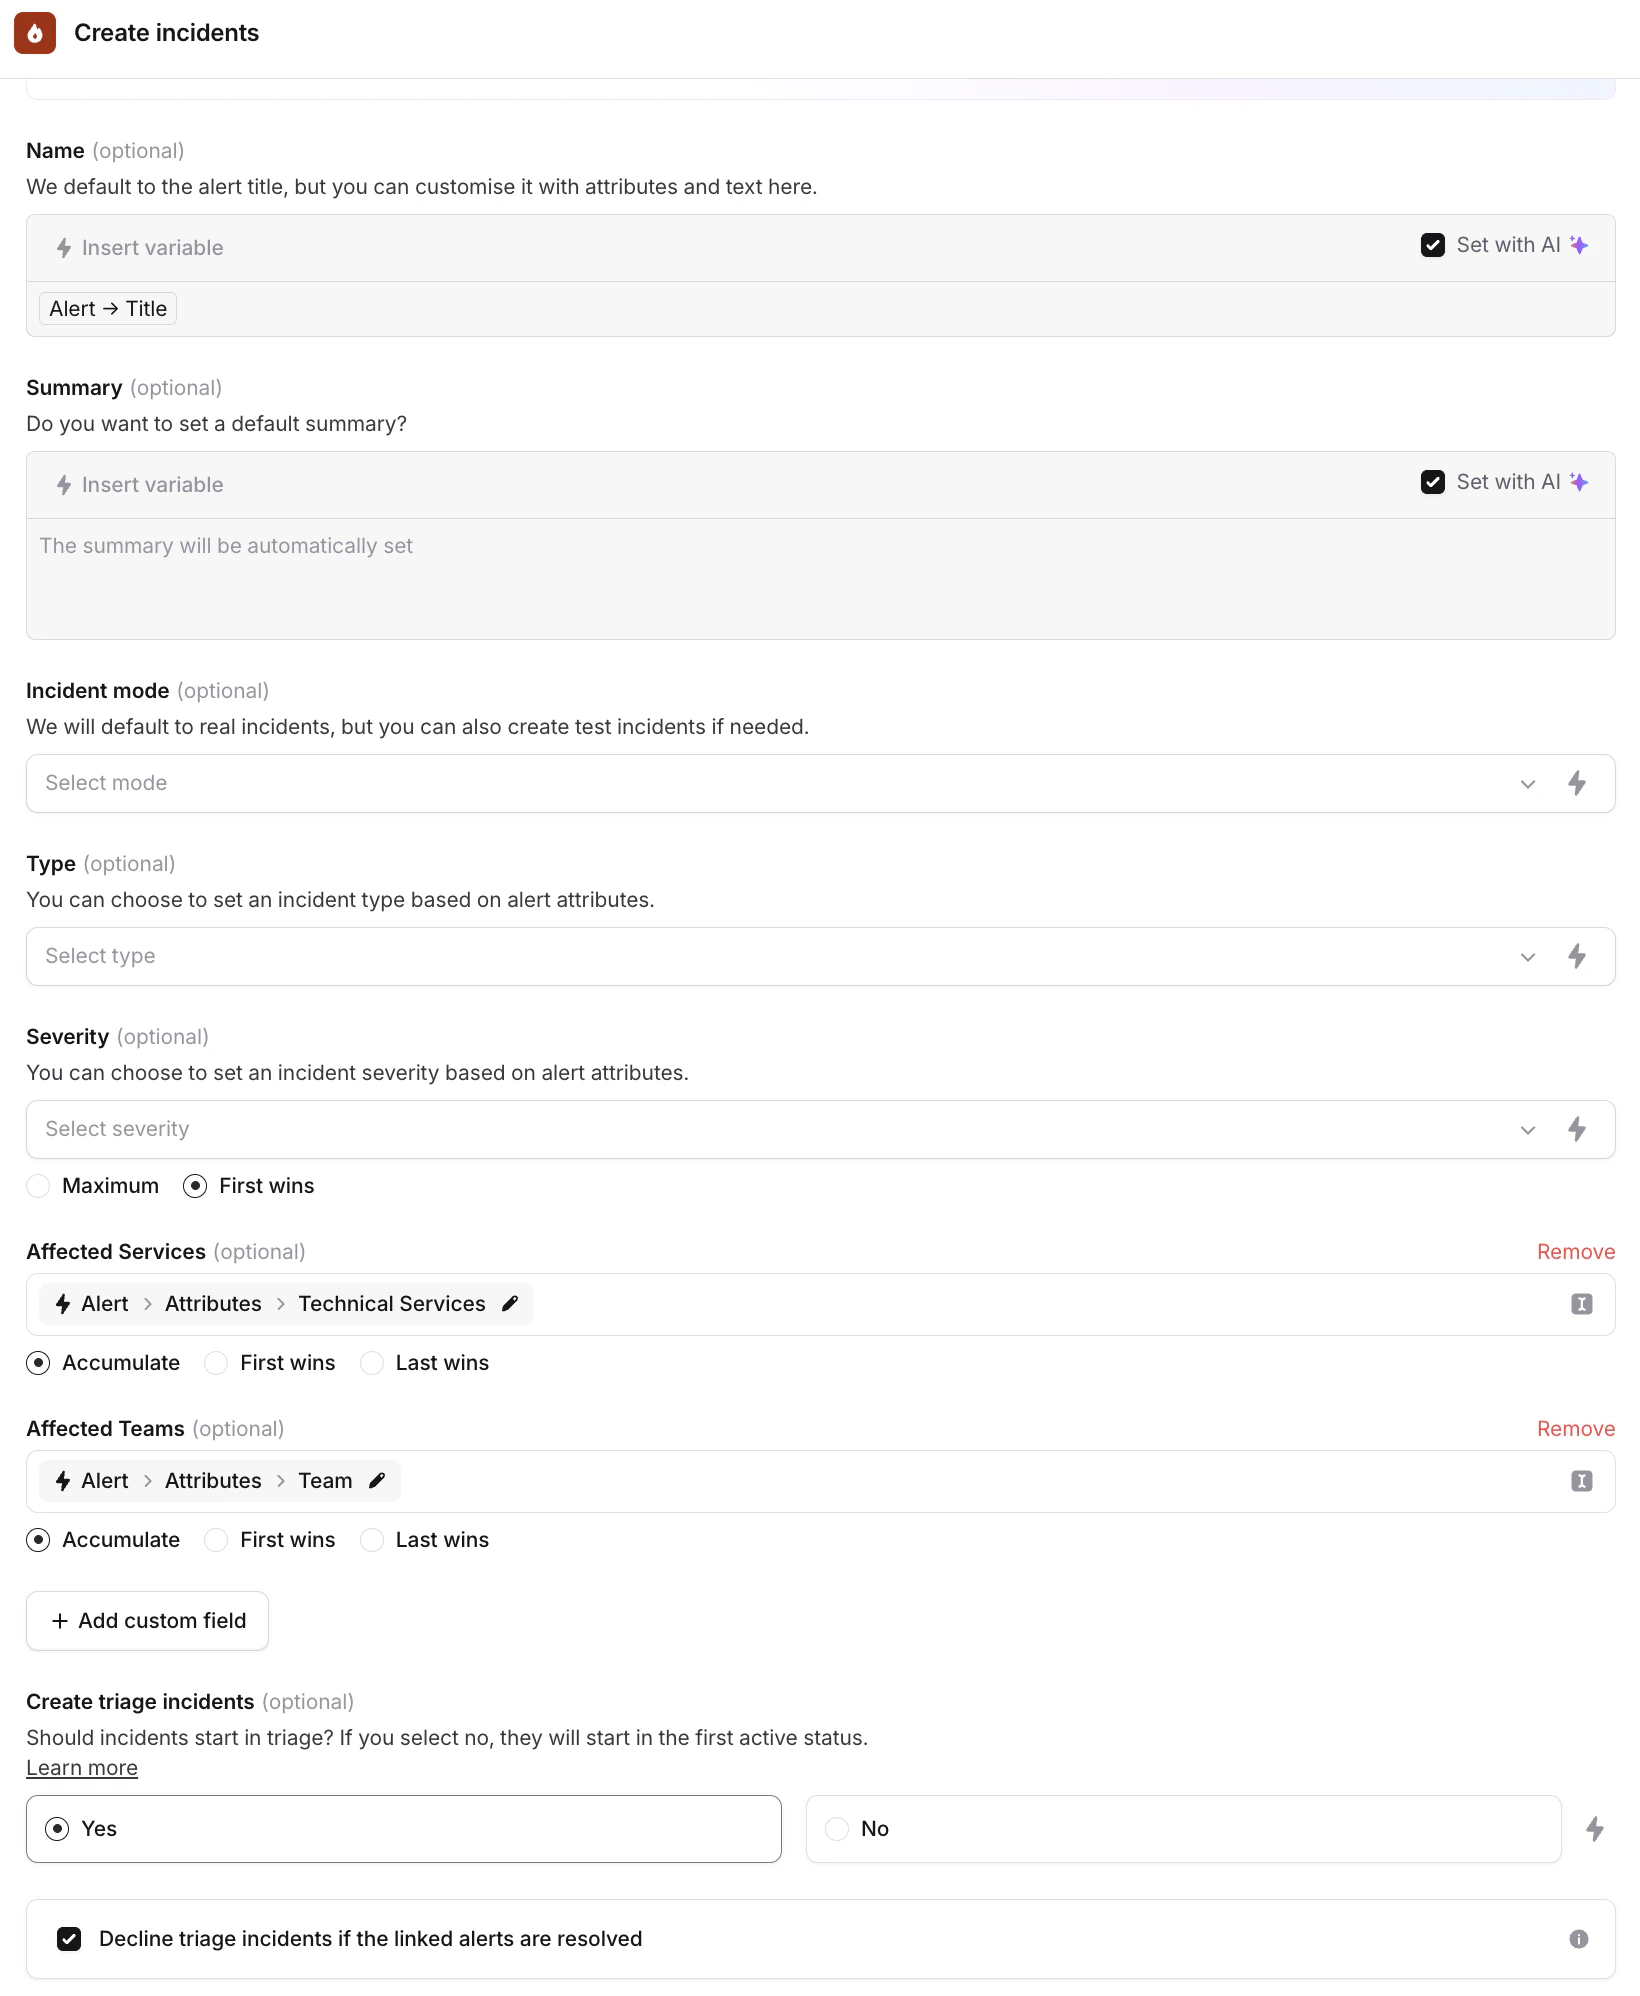
2. Choose what information you want to get shown about an incident in the Slack channel when it is posted. You can see a preview on the right side of the screen.
(We recommend ticking "Set with AI" so we can rename your incident and set its summary automatically using the alert's context!)
3. Dynamically set the incident's severity, and pass any data from your alert to your incident using the "Add Custom Field" option (this will let you e.g. pass the tagged Service on your alert as the Affected Service on your incident), keeping data consistent and auto-populated
4. Tick the "Decline triage incidents' box if you'd like to automatically reject triage incidents when the alert resolves itself
If an alert isn't part of a [group](/alerts/grouping-alerts) and its priority increases after it's already been escalated (for example, your monitoring tool sends an updated version of the same alert at a higher priority), we'll automatically trigger a new escalation to reflect the increase. Grouped alerts have their own equivalent setting for escalating **on priority increase**, described in [Alert grouping](/alerts/grouping-alerts).
## Creating incidents
You can choose exactly when and how you want to create incidents, and what type of incident, when alerts are received.
Note: We recommend declaring Triage incidents alongside your paging, as this allows your team to have a dedicated spot to collaborate, and if your team decides this is not an incident, you can simply decline it! Otherwise, if this turns into a real incident you already have all your troubleshooting context in the Slack channel.
To skip triage and create incidents that are immediately active, select **Active** as the starting status. This is
useful for high-confidence alerts that don't need manual confirmation.
1. Go to the Incident Details
2. Choose what information you want to get shown about an incident in the Slack channel when it is posted. You can see a preview on the right side of the screen.
(We recommend ticking "Set with AI" so we can rename your incident and set its summary automatically using the alert's context!)
3. Dynamically set the incident's severity, and pass any data from your alert to your incident using the "Add Custom Field" option (this will let you e.g. pass the tagged Service on your alert as the Affected Service on your incident), keeping data consistent and auto-populated
4. Tick the "Decline triage incidents' box if you'd like to automatically reject triage incidents when the alert resolves itself
 We also allow you to turn off incidents and just escalate based on alerts, you can read more about [Paging without incidents here](/internal/paging-without-incidents).